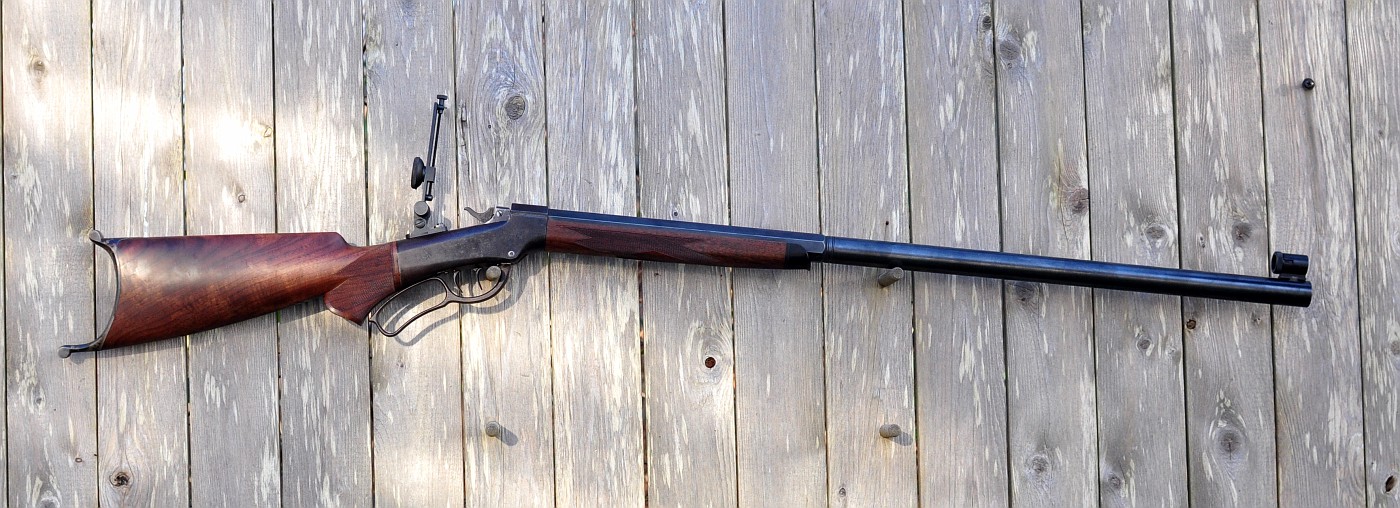
Here is a quick story about my Ballard single shot rifle.
I’m a nut about these vintage single shot rifles. It started with the acquisition of an 1874 Sharps a few years ago. I thought it would be fun to use on the Side Matches at the Cowboy Action Shoots that I’m active in and at various “Buffalo” shoots they hold here and there around New England (That would be “Steel” buffalo targets at out to 600 yards. Ain’t too many live buffaloes roaming around New England!). Well, anyways, the Single Shot Rifle Bug hit and I was off to another collection. A Couple Winchester High Walls, A couple Springfield Trap Doors, A Remington Rolling Block, a few Stevens 44 and 441/2 soon found their way into my gun rack. 38-55 and 45-70 being the calibers of choice.
At a gun show a couple years ago I bought a book…”A Guide To The Ballard Breechloader” by George J. Layman. After reading it I was off to hunt down a Ballard. Not that easy. Lots of Cast Frame, Weak actions but few Forged strong actions available. And what I could find were going for thousands of dollars, even in unshootable condition. I knew I wanted a Ballard that could handle the 38-55 cartridge, so that meant I needed to find a good Forged action and stay away from the older cast frames.
A few month ago I was once again on the internet looking for used Ballards (and any other single shot rifles that might catch my fancy). A classified ad web site from Maine popped up and there was a Ballard for sale just over the border in New Hampshire. And the price was $1600! I called the fellow up and he assured me the rifle was in very good condition. It had been in his family since new!  This was a Saturday night and he grilled me for some time on the phone about my intentions for the rifle. It was obvious it had sentimental value and he wanted it to go to a good and appreciative home. I guess I convinced him of my good intentions because he agreed to show me the rifle the following morning, in North Conway NH. About a three hour drive from my house.
I woke up early on Sunday morning and hit the road. He wanted to meet me in a church parking lot. I met him at 8am and we were examining the rifle in the parking lot just as church let out! Not an eye was glanced in our direction. Remember, this is New Hampshire….Live Free And Die. Folks keep to themselves, as it should be and guns are just another tool to folks up there.
The owner told me the story of the rifle.
It was bought after the Civil War by an Army Officer of some regard, Stephen Minot Weld. The Welds were and are an illustrious Boston family. A Former Governor of Massachusetts, William Weld, is his first cousin twice removed. Actress Tuesday Weld is his great-granddaughter. You can read all about Stephen Welds exploits in the Civil War and his gained and lost and gained again fortunes after the war here: http://en.wikipedia.org/wiki/Stephen_Minot_Weld,_Jr. Amazing guy and an interesting story to say the least!
So the rifle has great provenance. Especially here in Massachusetts. But in the condition I received it, it was unshootable.
The action was in great shape. But the bore of the barrel was a rusted sewer pipe. This was the corrosive “Black Powder” era. With extremely corrosive mercuric primers. If they weren’t maintained religiously, the bores of these old rifle would be useless after 140 years.
This is the condition of the rifle when I received it:

The action was in real nice condition for a 140 year old gun. Double set triggers were the “deal”!
Unfortunately, someone must have dropped the rifle on its heal at some point in its life and broke off part of the stock. Someone down the line effected a repair.

The forend was all there, but the checkering was worn smooth. This gun was used. Not a “Wall Hanger”

The set trigger did not function. If the rifle was cocked, the slightest bump would drop the hammer. Not good!

But the worse part was the bore of the barrel

I loaded some 38-55 black powder rounds and took it to the range. The bullets wouldn’t stabilize and at 50 yards would go through the paper sideways. If they even hit the paper!
This poor old gal needed some love. But how much love. Do I completely rebuild it with new finish, barrel and wood and destroy the provenance and wonderful patina?
Or do I remove all the parts I can without damaging the gun and save them, and replace with new wood and barrel? And not refinish the metal? I chose this option.
I needed a barrel. A quick call to Green Mountain Barrels and I had a brand new, full octagon .379 groove barrel in just about the same contour as the original.

For wood, God smiled on me and a fellow on the American Single Shot Shooters Association web forum came to the rescue. He had a Ballard just like this and he wasn’t happy with the style of the wood he had bought and wanted to replace it. He sold me a AAA Walnut stock and forend for a smok’n good price. Already checkered and finished. Just the checkering would have cost what he charged me for the set! The checkering was very fine with two dimensions on the forend. Classy! The butt stock held a beautiful case hardened “Schuetzen” style butt plate and a perfectly checkered wrist. If I had custom ordered wood for this rifle, this is EXACLTY what I would have ordered…
Back to the barrel….. I didn’t want a full octagon. I like the look and the balance of a “Half Octagon / Half Round” barrel…..So that is what this rifle would wear. And I really like what is called a “Wedding Band” between the transition of Octagon to Round. You’ll see more on this in a bit.
But first I needed to reduce the size of the octagon to perfectly fit the forend I acquired. It would fit as it was, but I was concerned the wood would swell and crack.
This was accomplished on my milling machine.

I set up a jig on the table so I could simply rotate the barrel, place it against the stops and cut the flats on the side of a four flute end mill. Turn the barrel 180 degrees and cut the opposite side. Do this eight time being careful to not remove too much material at once and warp the barrel. That would not be good!
The breech end of the barrel indexed against a pin screwed into one of the table slots:

And the muzzle was indexed against a simple piece of angle iron clamped to the table:

A simple hold down was placed in the center of the barrel to stop deflection and vibration

The barrel was clamped down securely. A couple passes on each flat and the a bit of “draw filing” and the forearm fit perfectly.
Now to the lathe to turn the round section, cut the “wedding band” and thread and chamber.
First the barrel was cut to length. I wanted a 30 inch barrel and this shank was not needed as I wanted the octagon barrel to match the octagon receiver shape.

The breech end was threaded and chambered with a Dave Manson reamer that I had specially ground to my cartridge with a Lyman 335g lead “bore riding” bullet

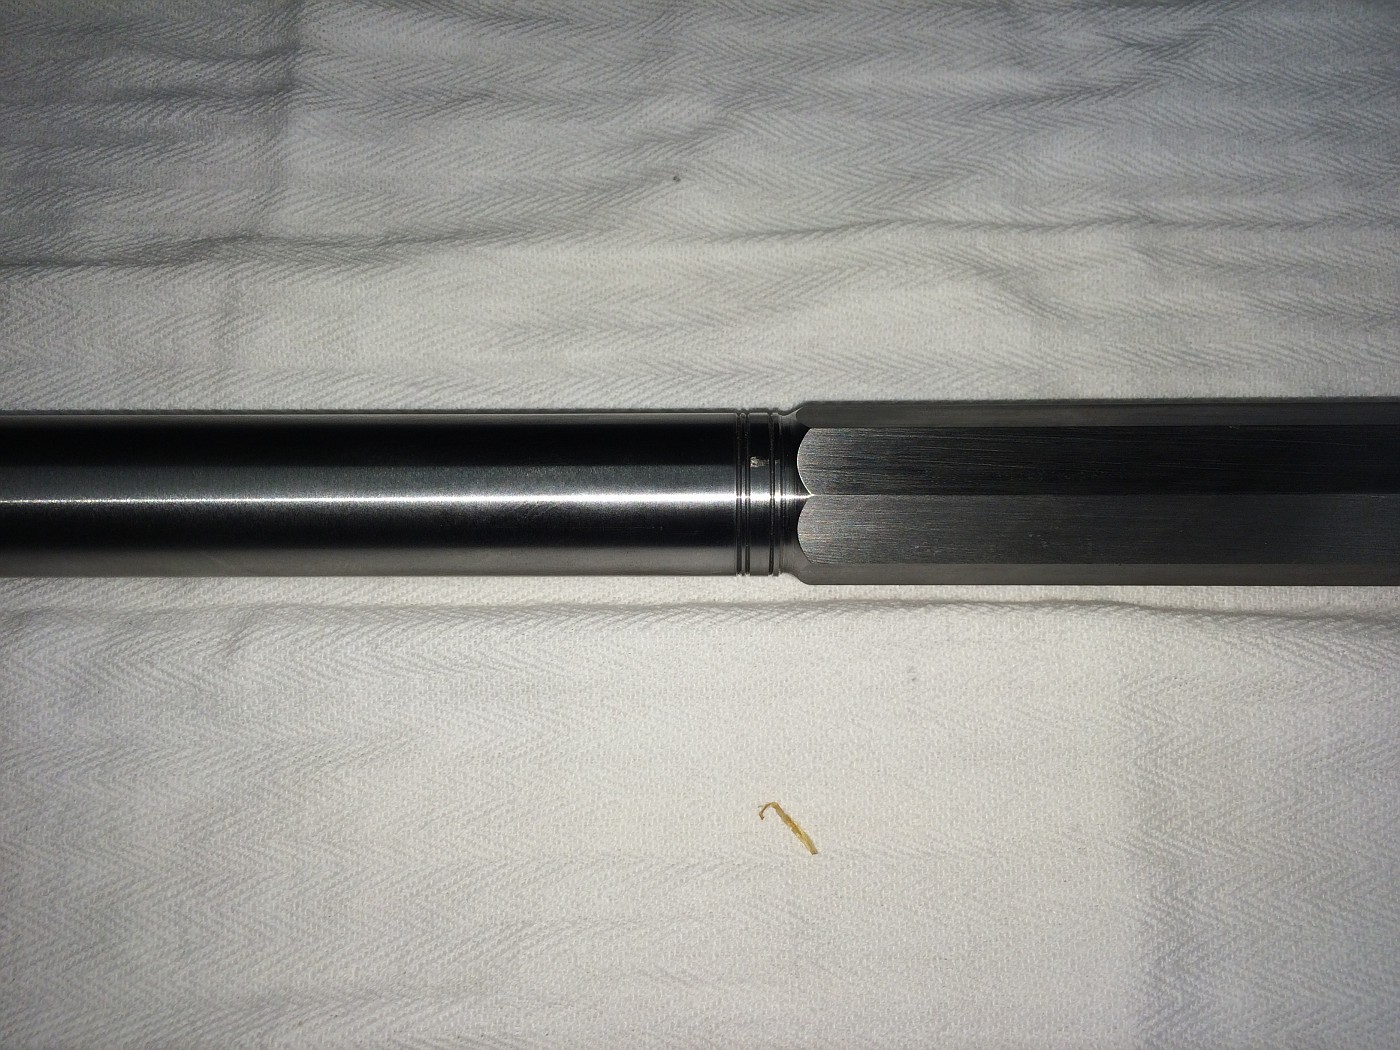
The barrel was turned from octagon to round and the “wedding band” added


The barrel is finished!

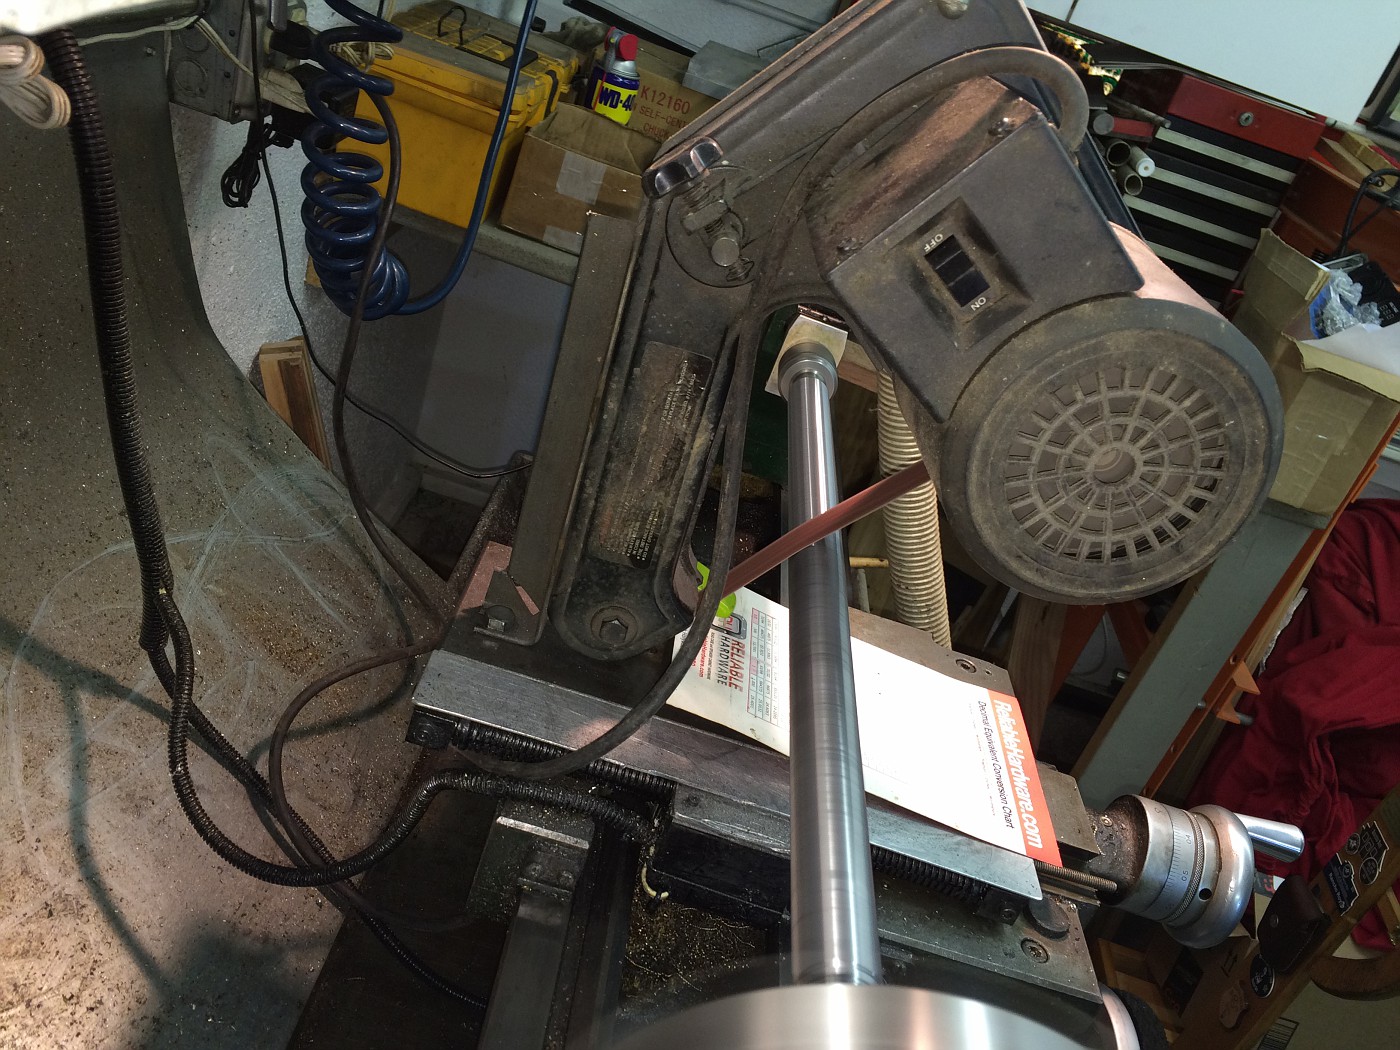
Here is a video of the contraption I built to sand down the barrel to final finish. It consists of a $50 bench mount belt sander attached to my apron with a vacuum cleaner to take care of the dust. This thing works the balls!
http://public.fotki.com/Rbertalotto/things-that-go-bang/1892-ballard/img-0260.html

The last thing that needed to be done to the barrel was to cut the extractor slot. Talk about nerve wracking! If I screw this up I have a huge problem as with an octagon to round barrel I can’t simply set the barrel back and start over.
I’d never cut an extractor slot such as this. It actually had about five dimensions to it. Not sure why Ol’ Mr Ballard made this so complicated.
This is what the extractor slot looked like on the old barrel:

First I laid out my cut lines on the new barrel with Dykem fluid and I made a little bent aluminum “guard” so the file wouldn’t scratch the other side of the breech:

Then with file in hand and nerves of steel…..I filed away a few hours:

File a bit, check for fit, file some more, check for fit….repeat!

After a few hours, here is what I ended up with. Works beautifully!


The extractor is a bit beat up from other gunsmiths over the years. Someday I’ll make a new one and fit it to the slot I filled.
(BTW, notice that slight “step” around the chamber. This rifle had quite a bit of headspace in its original configuration. The barrel needed to extend beyond the receiver ring. I just thought this looked nicer than the barrel itself being turned long)
The trigger assembly needed much “love”. With the hammer cocked, simply “setting” the rear trigger would cause the hammer to fall. Not good! The main trigger in the unset position had a trigger pull of about 5 pounds with a whole bunch of creep.

Nice thing about the Ballard is the whole trigger assembly is removable. Once out of the rifle it was a simple matter of using India stones and Swiss files to clean things up and reset angles. Not much material was needed to be removed. But the material was hard as glass. Quality stones and files were needed.


I removed the Breech Block to inspect it’s internals and look at the trigger sear. The block is two pieces. Split down the middle. Very easy to disassemble and inspect. The trigger and hammer sear needed attention. A few swipes with the stones and it was good. Interestingly, as I had the breech block apart, I could see that the trigger spring had four teeth along its edge. I sat there on my “Thinking Stool” for some time trying to figure out what these four teeth were designed to engage. There was nothing there for them to work against. Then it dawned on me. The trigger spring was a piece of bandsaw blade! Someone, long ago, must have replaced a broken trigger spring with a piece of spring steel bandsaw blade! It worked great so I left it there. Another bit of Provenance. If only these old guns could talk!
After all this work I now have an 8oz “set” trigger and a 3 pound main trigger. No creep what so ever. It “Breaks like glass”. Hopefully I didn’t cut through any case, surface hardening and my trigger job lasts. If not I’ll remove the pieces and harden with Kasenit. Time will tell.
Time for the wood.
The wood is fantastic! Buffalo Horn forend cap….Schutzen style butte plate….wonderful checkering….all on AAA Walnut! I love nice wood on a rifle!
The forearm simply needed a hole drilled and tapped in the barrel for the screw. The milling machine makes quick work of this. Done!


The stock simply needed a bit of epoxy bedding material for a perfect fit and to stop the possibility of the wood splitting in the wrist. Known as a “Ballard Break”

And finally a dovetail was hand filed on the muzzle for the front sight

Notice the finish on the barrel. When I blued it initially, it didn’t look right. It looked to “new” compared to the “un-refinished” action.
So I hit it with some 0000 steel wool to take the blueing off the hard edges and look like honest wear and then I went over it with Plum Browning solution to make it look aged. The folks at my rifle range were convinced the barrel was the same age as the action!

A tang sight from Lee Shaver finished the deal:

I took her to the range and the first three rounds created a nice triangle of 2″ at 200 yds with the Lyman 335g bullet cast of 1-20 Alloy with as much FFF as I could stuff in the case! It will only get better with time and some more load development. Breech seating the bullet might prove even more accurate.
(UPDATE: My GO TO load is now 8gr of Unique with a 3/4″ piece of toilet paper rammed on top of the powder to keep it against the primer and just about any 250-260g bullet. Recoil like a 22RF and unbelievable accuracy!)
So there you have it…………A Ballad about a Ballard!


Thanks for reading!
Many more pictures of this and other firearm projects here:

Pingback: Just picked up a JES rebored 38-55 - Page 4