
I’ve started a journey to the world of “Paper Patched” cast bullet shooting. Back in the days of the Buffalo Hunters and the Civil War, most folks used “Paper Patched Bullets” in their rifles. Paper Patched bullets have no lube grooves like a conventional lead bullet. A PP bullet simply has straight sides and the bullet is wrapped with a very thin sheet of paper. The paper rides on top of the lands of the barrel, keeping lead fouling to zero and in many ways imparting accuracy that lube grooved bullets might have a hard time duplicating. Especially at longer shooting distances. All those grooves on the lubed bullet add drag. Another advantage is since a PP bullet rides on the top of the lands and not in the grooves of the barrel, you can seat the bullet way out in the case, increasing the amount of powder the case can hold for increased velocity……..Well, that’s how the general consensus reads….We’ll see!
I’m not going to discuss the whole idea and theory of paper patching a lead bullet for accuracy. That is not the reason for this article. I’ve listed two fantastic books on the subject and a few internet forums that you can research to understand better the whole idea. This article is about using your lathe and milling machine to make a mold to cast bullets suitable for paper patching.
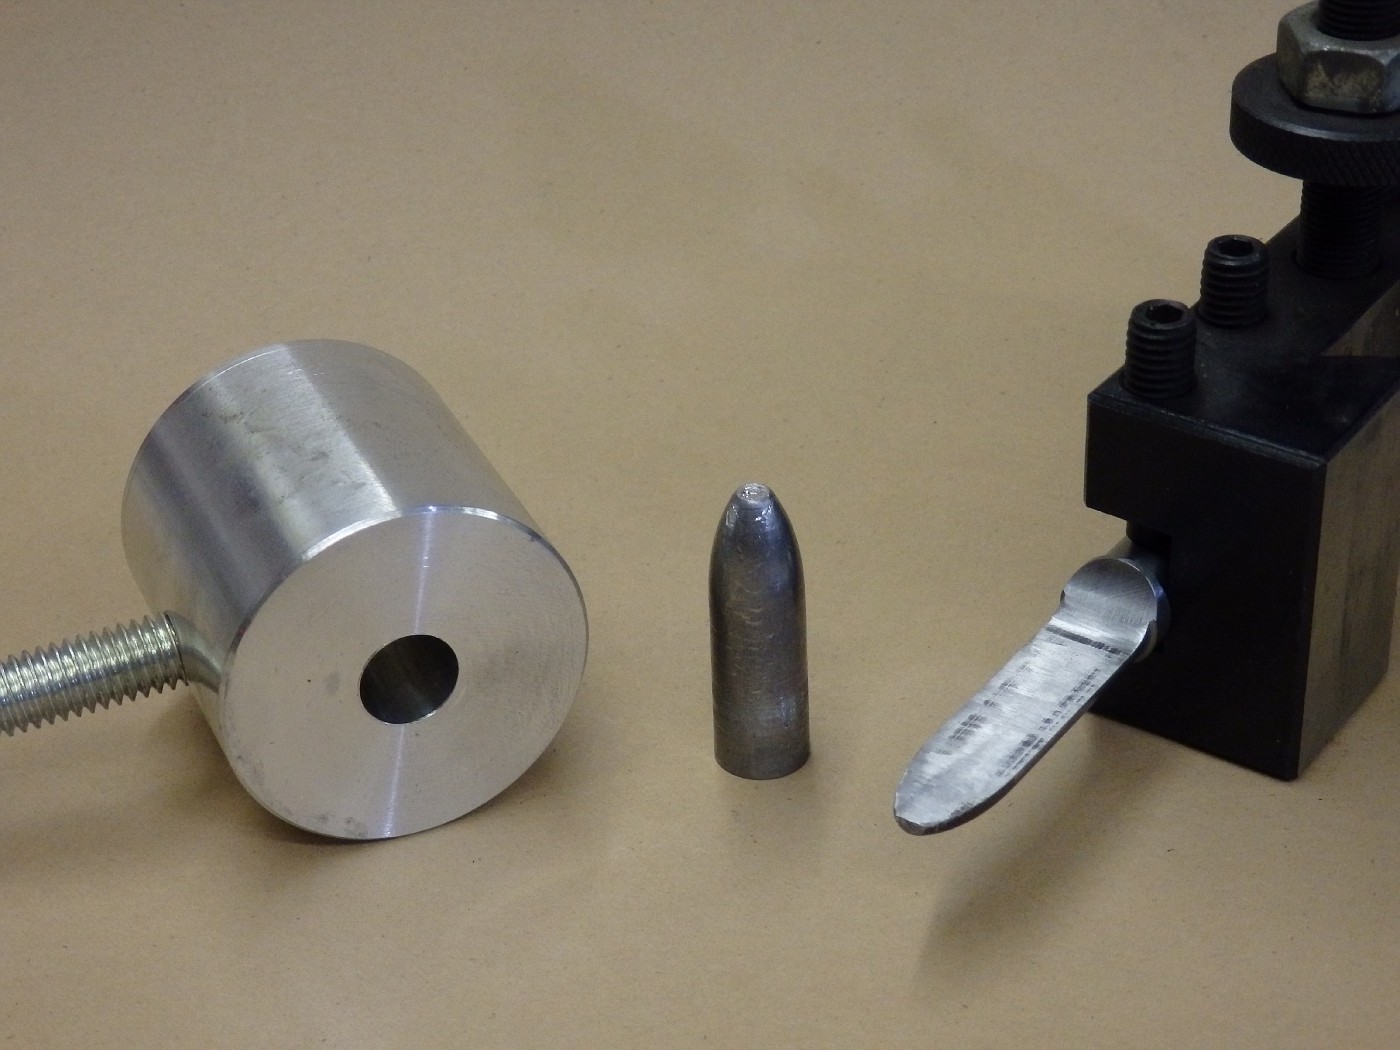
Lube Grooved bullet on left / Paper Patched without the paper on the right
One of the issues involved with Paper Patching is the bullet needs to fit the bore nearly perfectly for best results. This means you need to carefully measure the bore of your rifle and then have a custom mold made by one of the many mold makers.
Looking at a Paper Patched bullet without the lube grooves it appeared that it might be very easy to make my own mold. I have a lathe and a milling machine….How hard could it be!
I did some research on the internet and three forums have quite a bit of information:
ASSRA Â Â http://www.assra.com/cgi-bin/yabb/YaBB.pl
Cast Boolits   http://castboolits.gunloads.com/forum.php
Historic Shooting   http://historicshooting.com/mybb/index.php
Great folks on these sites that will really help out anyone just starting down the road of lead bullet shooting.
So first I needed to measure the bore of my rifle. To measure the “groove” diameter, you simply take a soft lead ball, somewhat greater than the diameter of the hole in the barrel and you drive it into the bore. Once it pops out the other end you measure it and there is your “groove” diameter.  Pretty easy and this should be done for ANY firearm shooting lead bullets whether paper patched or lube groove. If your bullet does not fit your barrel properly, it will lead to terrible “leading” of the bore and reduced accuracy.
This drawing might make it a bit easier to understand BORE and GROOVE:
A barrel is “bored” and then the rifling lands are cut leaving “grooves”…
“Y” is the groove diameter / “X” is the bore diameter

Once the slug pops out of the barrel, measuring the bore is a little more difficult than measuring the grooves. You will be measuring in the “valleys” of the slug rather than the outside area. And you can’t get a standard micrometer into those valleys. The barrels/indicating surfaces on a micrometer are simply too big in most cases. And calipers are simply not accurate enough for what we are trying to accomplish.
Micrometer:

Calipers:

If you have a few extra $$ hanging around, there is such a tool called a “Blade” Micrometer that CAN get into those small valleys. But I don’t posses one…

So I went a different route. I used something called “Pin Gauges”. Â Pin gauges are precision ground little cylinders that come in a kit of various sizes. Usually you would buy a kit that ranges from .061 to .250″ and a second set that might span .250 to .500″.
These gauges include every diameter within the range in .001 steps. I have pin gauges in the shop from .061 to .500″ so I decided to use these to measure “bore” diameter.
Pin Gauge:
The rifle I’ll be working with is a beautiful Winchester 1885 BPCR with a Badger barrel in 45-70 caliber.

Using a Pin Gauge, I found the bore to be .4510″. A .4520 gauge would not fit and a .4500 was too lose. The .4510 gauge was a perfect tight fit. To verify this number I used something called a “Small Hole” “gage”. This device has an expandable ball on the end. You insert it into a hole and turn the handle until you feel resistance, just like a micrometer. Withdraw the gauge from the hole and measure it. The number recorded from the hole gauge matched the pin gauge perfectly!
So now that I know I have a .4510″ bore, I need to figure out how big in diameter my bullet needs to be, once wrapped with two layers of paper.
For wrapping paper, most folks are recommending #9 weight Onion paper with 25% cotton content. Just so happens, Buffalo Arms has this exact paper available for bullet wrapping. BTW…If you shoot lead bullets and you are not familiar with Buffalo Arms Corp, you are really missing out. Â Â http://www.buffaloarms.com/Â Â If nothing more, order up one of their catalogs. A fantastic read and will keep you in the bathroom for hours!
This paper I sourced from BAC has a thickness of .0016. Therefore a double wrap on the bullet will add .0064 to the diameter. So simple math says….. .4510 bore diameter  minus .0064 four layers of paper  = .4446″. I need a bullet .4447 if I want a .0001″ tight fit once the bullet is loaded in a case.
NOTE: Â There is Lots and Lots of conversation on what should be the ultimate diameter of a patched bullet. It runs the spectrum of groove diameter to exactly bore diameter. There are two excellent books on the subject. Highly recommended readings.
“The Paper Jacket” by Paul Matthews  and “Loading and Shooting Paper Patched Bullets / A Beginners Guide” By Randolph Wright
I decided I’d make my bullet just a smidge bigger than bore diameter.
OK, so I want a bullet .4437 in diameter. I could order a custom mold from BAC, Accurate Molds or any of the other dozens of custom mold makers here in America. Or I could make one myself!
I love making things and discovering new ways of doing things. Â Back in the day, before CNC machines and the ability to call up Dave Manson at Precision Reamers http://www.mansonreamers.com/Â Â and order just about any type of reamer your heart desires, gunsmiths would make what is called a “D” Reamer
It’s called a “D” reamer because it is shaped like the letter D when viewed from the end. Simply a piece of round drill rod, shaped to the final shape you need and then ground or slit in half to create a cutting edge.

For my reamer I started with a piece of W1 drill rod. W1 is very easy to machine and it can be hardened simply by heating it up and dunking it in water and then tempering it in your kitchen oven. I use it for all kinds of cutting tools especially if I’ll be working with aluminum.
A piece of .500″ W1 Drill Rod was inserted into the lathe and turned to .4450….

I’ll sneak up on my final diameter of .4447 with filing and polishing.

The next step was a rough contour of the nose using the compound on the lathe

And final shaping using a very fine file and 400 grit sandpaper. I tried to copy the shape of the “Postell” bullet. A proven accurate shape for over 100 years.

The shank was then turned to a diameter that could fit in my Floating Reamer Holder if this was the method I chose to use to bore the mold (more on this in a minute)

Now it is off to the milling machine!
Set in the milling vise, and indexed so the cutter is just touching, the DRO was set to Zero and exactly half of the D reamer was removed (.22235″)


The reamer was then taken over to the bench and on a piece of surface polished granite I keep just for this purpose, the flat edge was sanded down using 220 grit to 600 grit wet/dry paper and finally on a medium and then a  fine diamond hone. At this stage of the game I didn’t bother hardening the W1 steel as I was just interested to see if the darn thing would cut! I did not relieve the back side of the reamer as some folks had suggested. I left it as it was and honed the cutting edge until it was sharp enough to shave wood and easily slice heavy paper.
I decided to use round aluminum 6061 stock for the mold. Much easier to chuck up in the lathe than a square block of aluminum. This is not going to be a two half / split type mold. But simply a hole in a block of aluminum and hopefully to eject the bullet a sharp smack of the edge of the mold on a block of wood and the bullet would come flying out!
A piece of round 6061 aluminum was chucked up into the lathe. And cleaned up.

A hole slightly under the finished size hole was drilled into the material

Here is where the fun starts….I tried using a Floating Reamer Holder that I use when chambering barrels.

But this didn’t prove rigid enough and without a pilot it simply refused to cut.
I decided to mound the reamer in the cross slide, indicate it to the chuck center and advance it with the hand wheel.
This worked great until I got to the point where the nose started to cut. Â I had to use a drill the same diameter as the tip of the nose (1/8″) and pre-drill this area. Once I did that, the reamer cut like a hot knife through butter! Beautiful nice slivers of aluminum!
The internal finish without touching it with sandpaper is superb! I did not bother polishing the bore as at this point , I had no idea what the finished bullet diameter would be.

I parted the piece of aluminum round off and drilled and taped a 3/8-16 hole for a handle (A piece of threaded rod serves the purpose until I can turn a nice handle for it.)
Before I install a sprue cutter, I wanted to be sure my plan of tapping the mold on a piece of wood to eject the bullet would work.
I heated up some 1-20 Alloy to 725 degrees, heated the mold on my hot plate to 350 degrees and poured my first bullet in the first mold I ever made. Once the alloy hardened, I tapped the mold on a piece of oak with a soft cloth to catch the bullet…..BINGO! The bullet popped right out and looked great! Â I cast a dozen of them and by the third bullet, they were in 100% shootable condition.
Once the bullets cooled, I measured them. .4446+….Just a tiny bit under my target goal. I can easily polish to this diameter if I think it needs it once I shoot a few.
This is the first bullet that dropped from the mold!

Before I install a sprue plate, I’m going to experiment with length. As they come from the mold they are a bit longer than a Lyman 457-132 “Postell”. If I cut the sprue off at the exact same length as the Lyman Postell bullet, they weigh exactly 550g. This might be a bit too heavy, so using the lathe, I’ll cut a bunch of bullets at different lengths to see which ones are more accurate, then I’ll mill the mold down to this length and install the sprue plate.
Or I might get fancy and convert it into a “Nose Pour” type mold. This would allow me to leave it long and cast bullets of different lengths and with different base details…….Stay Tuned!
So there you have it….Home Made Mold for Home Made Paper Patch Bullets!
I’m excited to be walking down this road of yet another shooting discipline that will keep me up at nights wondering how I can improve on something that folks have been doing for over 150 years!
Be Safe!
UPDATE 3-29-15…… Boring out a LEE mold to cast paperpatch bullet
The LEE Aluminum molds are very inexpensive so I bought one from the local gun shop in 30 caliber to be bored out to .4445. Be sure if you do this that you choose a mold that is long enough for the length of bullet you want to cast. I chose a LEE C309-200-R #90370. And as you will see it was barely long enough for my 525 g Postell type bullet
Here is how I set it up and cut the cavity:
An independent 4-Jaw chuck was installed in the lathe. A tight fitting piece of drill rod was installed in one of the holes of the mold

This allowed me to get rather close in setup by using the drill rod in the drill chuck in the tailstock of the lathe:


Once I was close with the above set up, the hole in the LEE mold was dialed in perfectly

Now I needed to modify the D-reamer I’d used previously. I found that simply turning a bit to the actual final diameter and drilling a hole in a block of aluminum was not as accurate as I’d like. I decided to use the D-reamer like a boring bar and using the cross slide…”sneak up” on my final diameter.
The back side, bottom and nose of the D-reamer were greatly relieved so it would fit into a slightly undersized hole I’ll drill before reaming.
In this picture, the actual cutting edge is on the bottom:

The bottom of the nose was ground away:

And the back and bottom of the reamer was removed:

The only area that will be touching the cavity is the cutting edge that is the profile of the resulting bullet
With that done, it was time to set the reamer into a tool holder and get to cutting!
The LEE mold was drilled out with a 3/8 ” twist drill to remove most of the material and make it easier for the D-reamer to cut. A tight fitting Gauge Pin was inserted into the grilled hole and the D-reamer set parallel.

Now it was just a matter of taking extremely small cuts. Very slowly inserting the reamer, removing…moving the cross slide a few thousands and cutting again. I used gauge pins to constantly check my diameter as I sneaked up on my .4445″. WD40 was used as a cutting fluid and the reamer cut beautifully!
Here is the finished product. As you can see, I needed to do it twice. The first cavity came out a bit too long and for some unknown reason the reamer cut a “bottle-neck” shaped bullet! I must have bumped something.

So re-position the second cavity and do it again! This time it came out perfect! The surface finish you see is untouched after reaming. I did not hone the cavity. The D-reamer really cut the aluminum well!

That “bottle-neck” bullet will actually be used as a “slug mold” to measure the lands and grooves of 45 caliber barrels as it ended up .458″ in diameter. I could ream it out a bit further.
The final diameter of the good cavity ended up at .4443″ the best I could measure it. This is a bit smaller than where I wanted to be, but I can use a bullet as a hone with grinding compound and bring it to the right size. I’ll shoot a few “as cast” first to see how they perform.

I cast a bunch of bullets and they popped out beautifully. After cooling for two hours the diameter as cast is .4430 with a slight taper to the base of .4445.
Can’t wait to “RollEm’ and ShootEm’ ”
4 comments on “Paper Patch Bullet “D” Reamer and Shop Made Casting Mold”