
This is a quick article about my path to obtaining a Nelson Pass class A amplifier to add to my ever increasing stereo HiFi collection.
First, who is this Nelson Pass fellow. Nelson is a designer of HiFi equipment. Along with David Haffler of Dynaco, no one has done more for the DIY, Kit Build HiFi industry.
Mr Pass is a “Giver”…..He freely offers his amazing amplifier designs to anyone that wants them. Obtain the parts necessary and you can build some of the finest HiFi equipment on planet earth. For a very reasonable investment.
He also owns a manufacturer of extreme high quality (read expensive) HiFi equipment called PASS LABS. Here, assembled and fully warranteed amplifiers start at $4000.
I’m not going to list all the accolades bestowed on Nelson Pass in this article. It would take pages. Instead simply do a Google search for “Nelson Pass” and read for hours!
I became involved with Pass amplifier topography many years ago through a company called “Adcom”. Before Nelson had his own company he was designing product for other manufacturers. One of those products has become an audio legend in the HiFi world. The ADCOM GFA-555. This amplifier sold for around $600 in 1995 and today a used one will bring this much or more! And at around $600 today, you would be hard pressed to buy a modern amplifier that will out perform it at three to four times this amount!

When I first heard an ADCOM GFA-555 through a pair of Dahlquest DQ10 loudspeakers I was blown away. Sound stage, imaging, depth, bass response was simply amazing. There was something special in this amplifier.
Around that time I was attending a HiFi show in LasVegas and got to meet Nelson and spend about an hour discussing his philosophy about amplifier design. To be honest, 90% of it went right over my head. But the passion this man had for the art of music reproduction was not wasted on me. I became a fan.
Over the years I’ve had lots of stereo equipment. I owned HiFi stores and was an executive with a national chain for over 40 years. But I never got around to owning one of the ADCOM GFA-555 or a PASS LABS amplifier.
That all changed a few weeks ago when a local classified ad popped up with a “First Watt F5 Turbo V2” amplifier became available for $500.
Although “PASS LABS” is a full blown manufacturer of high end HiFi equipment, Nelson Pass also owns a much smaller company called “First Watt”…(If the First Watt out of an amplifier doesn’t sound good, all the rest won’t either)… This First Watt company is basically run by Nelson out of his kitchen in his spare time. Here he designs amplifiers for the DIY (Do It Yourself) crowd. And it’s a BIG crowd!
The amplifier I was buying was built by Who Knows Who ( I actually tracked down the builder whos name will remain anonymous as you will soon see why)…..This is a huge risk when buying any Kit Built electronics. But the seller assured me that the amplifier worked great and had been for over 15 years. And was assembled by a reputable builder……
I took a leap of faith and bought it.
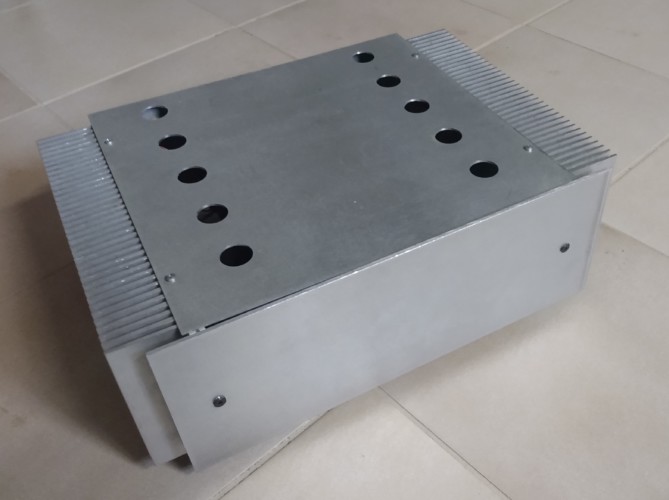
As you can see, it looks like something that was built in someone’s kitchen!
Why did I covert this amplifier when I have a half dozen other amplifiers in my collection?……It is an extremely simple design and it is pure Class A topography. So what? Well, most solid state amplifiers are class A/B….This means they use two transistors to complete a single wave form of music. The bugger is when one transistor needs to hand-off the wave so the other transistor can complete it. This happens thousands of times a second. It takes lots of money and lots of circuitry to get this right. CLASS A amplifiers use one transistor to complete the whole wave….no hand off. (Ok, I know the wiz kids reading this will take me to task for such a simple explanation. This ain’t a thesis on CLASS A vs CLASS A/B…..Sit down please!)
Anyways, why build class A/B if Class A is so much better. First, there are lots of audiophiles out there that claim a well designed class A/B amplifier will sound just as good as a CLASS A. I have to admit, I have a Yamaha M45 amplifier in my collection. It offers a switch to run it full class A or in A/B. I’ve pushed that switch a thousand times and I really can’t hear the difference…..At least with my ears and my speakers in my listening room (Magnapan MMGs, KEF 103.2, KEF LS50 METAS)
Second, it is easier, cheaper and more reliable to build A/B amplifiers. Class A amplifiers use lots of current and run very hot. To control both of these takes huge transformers and lots of heat sinks or other heat mitigations.
Third, High power output is MUCH easier to accomplish with CLASS A/B….Quite easy to build a 200 or 300 watt per channel amplifier with A/B. Class A amplifiers tend to be very low power. Many under 10 watts per channel. And anything over 50 watts per channel starts to cost real DoReMe!

PASS LABS XS300….$85,000.00 300 watts per channel…206 pounds total weight for amplifier and external power supply!
So, CLASS A uses lots of power, gets really hot, costs a fortune and/or makes very little power….But I wanted one. I had to see what all the hub bub was about!
I got the amplifier home and the first thing I did was check the speaker outputs for “DC OFFSET”… Audio is AC (Alternating current)…If your amplifier is outputting too much DC (Direct Current) you will damage your speakers. There are loads of youtubes showing you how to measure DC Ofset with a simple $25 Volt-Ohm-Meter (VOM). This amplifier was outputting extremely little DC…SCORE 1!
I then connected it to a pair of Sony SSCS5 bookshelf speakers. These speakers are another, “I just got to see what all the HubBub is about”….Extremely highly regarded on the YouTube and Facebook HiFi review sites…..And they cost under $100 a pair! They are amazing and perform WAY beyond their price….And disposable if the amp blows them up! Used the Sound Artist integrated amplifier as a Preamp with a Node2i streamer for source.

Immediately I could sense something was very different with this amplifier….And it was very good! I was hearing things on these inexpensive Sony speakers I hadn’t heard before. Very slight nuances in the midrange, vocals and mid bass… It wasn’t coloring the music, it was just unveiling it.
So now that I was pretty sure the amp wouldn’t destroy my better speakers, I gave it the real test. Magnapan MMG planer speakers.

Magnapans are some of the most difficult speakers to drive. Folks claim you need Niagra Falls type of power to drive them. I disagree, you just need a very stable amplifier with lots of “current”…..
This amplifier, being an upgraded F5 with the “Turbo V2” modifications, outputs 50w/ch……And it drives the Magnapans beautifully! None of my other amplifiers do to the Maggies what this amplifier does….(Tubes4HiFi ST120 Dynaco Tube clone, Cambridge Audio 840 AZUR, Sound Artist SA200ia, Yamaha M45)
You can read all about the various version of the Turbo modifications here:
https://www.firstwatt.com/pdf/art_f5_turbo.pdf
So to say I’m very happy with my purchase of a Nelson Pass First Watt F5 Turbo V2 would be an understatement.
But then I removed the top cover…..Oh Boy!
This thing looks like it was built by POWs building a radio to contact the outside world!


Hard to believe with this build quality, it was working so well.
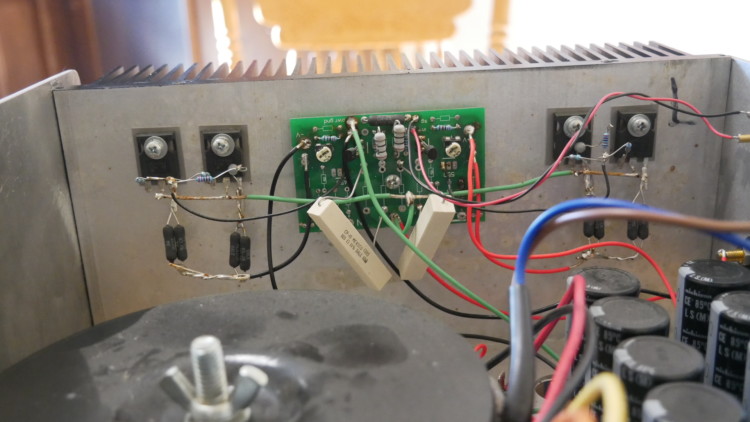
FaceBook has a HiFi DIY group. I joined and posted a few pictures of the interior asking for comments on what I should do. 98% of the responses was my house will burn down, I will electrocute myself and loved ones and my dog will get pregnant (I don’t own a dog!)…. But one fellow, Randy Thatcher reached out to me. He knew who built this amplifier as he has created a whole business rebuilding and repairing these particular amplifiers, most assembled by this builder. On the phone with Randy it became very obvious that he really knew these amplifiers inside and out. We reviewed the pictures together and decided to leave the amplifier sections alone. Yea, they look like hell with point to point wiring and questionable soldering, but as Randy said, if it ain’t broke, don’t fix it. And we can attack this area in the future if needed.
But the power supply was another matter. It was dangerous to me and my speakers. The builder never grounded the chassis and there was nothing to protect the speakers if something failed.
After I assured Randy that I could solder and assemble electronic components, he agreed to build me a totally new power supply board and send it with instructions on how to install. All for an extremely fair price! This amplifier weighs about 50 pounds with the huge toroidal transformer the Turbo V2 modification requires. I didn’t want to ship it to Ohio.
The new Power Supply Board arrived in a couple day. A total work of art. I wasn’t sure if I should just leave it on the coffee table as art!
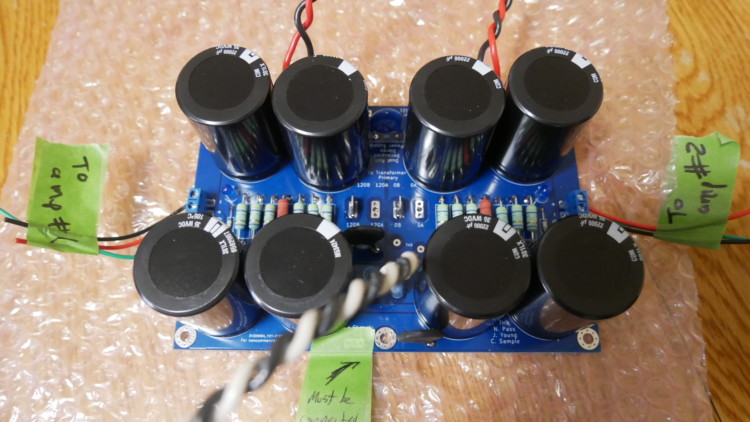
Ready to be installed with clear instructions….
I removed the old board and installed the new. Had to drill and tap a few holes, relocate the rectifiers and reposition a few wires. Really quite easy install.
Here is a photo of the two boards from the bottom……Are You Kidding Me!!!

If I had seen this, I might not have plugged it in. Amazing that this amp was doing duty for over 15 years!
So, board installed..(Only had to contact Randy once for advise…BTW, sent an email on New Years Day and said he didn’t need to call me immediately, a day or two would be fine. I’m in no rush…..He called me back within minutes!)

Powered it up. Did some voltage tests that Randy suggested…Hooked up speakers and MUSIC!
(VIDEO of Startup)
https://public.fotki.com/Rbertalotto/hifi-stereo-stuff/pass-labs-first-wat/p1040695.html
Other modifications I performed….
Moved power button to the front and added LED to see Power On:
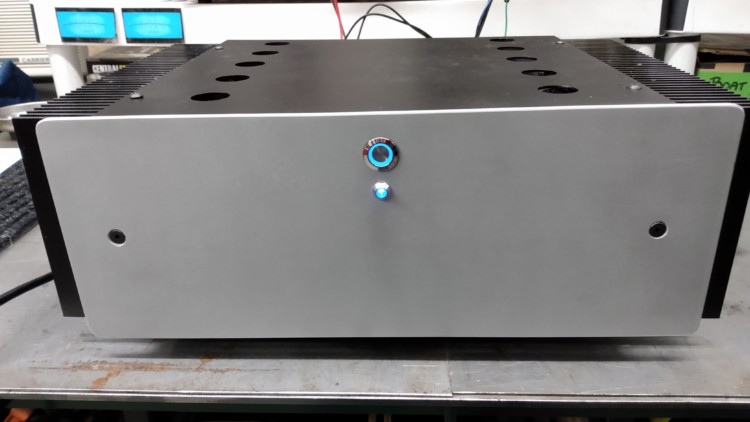
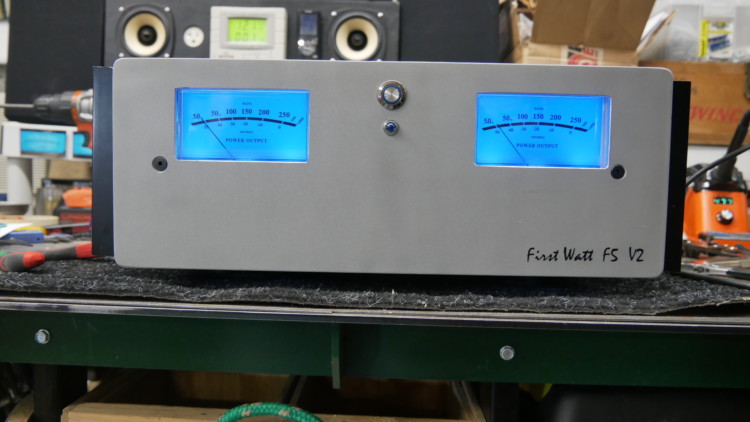
Painted top and heatsinks with HiTemp spray and thinking about adding VU meters to the front:

(These VU meters are just photos to see what it would look like)
So this is a wrap…For well under $85,000 I now have a Class A PASS amplifier in the collection.

This was a fun project, now on to the next!
THIS IS A GREAT REVIEW ON THE F5 …..All the specifications you might want with lots of charts and graphs…
http://www.6moons.com/audioreviews/firstwatt7/f5.html
Be sure to check out the other article I’ve penned:
UPDATE!
I just received this from Randall Thatcher. An explanation on what he did and why to the Power Supply Board:
There were 2 main goals for the new power supply board for this amp. First and foremost was safety. The improved performance was the icing on the cake. The replacement board is similar to the First Watt F7 power supply design, and it addresses both safety and performance.
Safety
The amp needed to have the IEC ground pin tied to the chassis, and then the power supply needed to be connected to the chassis. The audio ground on the board (clean ground) is connected to the chassis ground (dirty ground) through a CL-60 Thermistor. This can handle the potential fault current, and it acts like a hum-breaking resistor at ~10 Ohms in normal operation.
What’s more, the original power supply PCB was of poor quality. You’ve seen the pictures from Roy, what else can be said? Additionally, the original board didn’t have bleeder resistors that drain the capacitor bank when the amp is powered down. Bottom line, the original PCB needed to be replaced.
Last, the CL-60 inrush current limiter was soldered to the IEC with exposed legs. That means there was live 120VAC right where you can touch it when the amp’s cover is removed. That had to go.
Performance
The original board appeared to be based on a classic CRC filter (Capacitor-Resistor-Capacitor) topology. Upon closer inspection, the resistors were bypassed. It was a simple capacitor bank.
The new power supply board featured a number of elements to address both safety and performance. The soft-start CL-60 inrush current limiter is on the board. The hum-breaking CL-60 is on the board. The filter section is a dual-rail decoupled CRC. While it’s not a monoblock or dual-mono power supply, this design isolates the final power supply stages for each channel. This gets you some of the benefits of dual mono/monoblock without the expense of another chassis and power supply. The first bank of caps is 44k uF per rail shared with both channels. Then it splits off with 22k&22k per rail for one channel and 22k&22k for the other. This final decoupled power supply stage is a key design element borrowed from the First Watt F7 power supply design. The board also featured quick disconnects (spades & screw terminal blocks) for easy hookup.
As always – Thanks to Nelson Pass for his generous contributions to the DIY community.
Contact Randy through any one of the following links:
https://www.usaudiomart.com/details/649742722-tim-rawson-clone-amplifier-repair-and-restoration/
https://www.diyaudio.com/community/threads/rawson-repair-reflections.361593/
https://www.etsy.com/shop/ThatcherDIYAudio
UPDATE….1-19-22
Finally got the VU meters installed. The holes were cut on my milling machine and a bracket was fabricated that holds them in place and is anchored by the power button…..
http://rvbprecision.com/stereo/first-watt-f5v2-vu-meters.html
Don’t forget to look at some of the other HiFi build projects…. www.rvbprecision.com
Pingback: ICE Power Amplifier Build | RVB Precision
Pingback: AKITIKA Z4 Amplifier Kit Build | RVB Precision