
I’ve been collecting VINTAGE Nikon lenses for some time now. I’ve been using them with adapters on various cameras, Sony, OM, Lumix with fantastic results! These Vintage Nikkor lenses are amazing bargains and wonderfully engineered glass from the 1960 to the 1990s.
But recently I started reading about the older CCD sensors in older Nikon cameras. And how wonderful the photos this sensor renders. A bunch of research led me to the Nikon D200 and the Nikon D80. Both CCD sensor cameras. The D200 is a serious PRO camera and the D80 shares the same sensor in a more advanced hobbyist camera. Smaller lighter with many the same features. Looking for a D200 I realized finding a “Like New” specimen was becoming very difficult. Being a PRO camera most were worked hard and had massive shutter actuations. And were selling in the $200-$300 range (2026). So I started looking for a D80. USEDPHOTOPRO.COM had one in “Fair” condition for $50! If you’ve ever bought from UPP you know that their “Fair” condition is other online used sellers “Good” or “EX-“. I bought it and sure enough it is perfect with just a couple thousand shutter activations.
The D80 was bought to be used with a few Nikon EX-D series lenses I also acquired recently to go with it. But the main use was for my extensive vintage Nikkor lens collection. But I should have done my homework better. I knew all about the conversion being necessary, but the D80 had zero interaction with “dumb” lenses. It would not set anything. No Focus (Which I knew), no shutter speed, no auto ISO, no nothing. Totally manual. Unlike mirrorless cameras using dumb lenses, you pot the camera on “A”, manually set aperture and focus on the lens, and the camera takes care of ISO and shutter speed. Not with a D80. Before I continue, let me state I’m still thrilled with the D80. With modern Nikon lenses it is fantastic. Built like a tank. Great controls. Just feels extremely good in the hands….And that shutter fall noise is wonderful!
But now for a better solution for my vintage lenses. A camera with some type of queasy communication with the lens. In CCD sensor cameras we are back with the D200. It allows you to input lens data and will then set shutter based on the F-Stop you set on the lens. Manual focus of course. See reasons above as to why I didn’t go D200.
Next up was the absolutely fantastic D300! Talk about rave reviews on the internet and YouTube, some when it was introduced years ago and many from the present…”Is the Nikon D300 still a good camera in 2026″!….My answer would be YES! But the D300 is a CMOS sensor and not CCD whish was what I really wanted to experiment with my vintage lenses. (I can still use the D80, but lots of set up to take a picture. Like using an old VIEW CAMERA from bygone era.) But the CMOS sensor now gives me the option to see what the CCD hoopla is all about compared to CMOS. And both camera are same vintage for a real good copmparison.
The D300 has a much more advanced system for using modified NON-Ai lenses. You can set up a number of lenses in the menu and recall them as needed. (I don’t believe the D200 will store the lens info and it has to be input again at each shooting. There are confusing details about this on the internet. If you know for sure, let me know and I’ll update this article) But the D80 absolutely does!
I found a D300 on Ebay and it was located two towns over. I wanted to go pick it up but the “BLIZZARD OF 26” was upon us leaving 30+ inches of snow here in Southern New England. Ship it! Around 1000 shutter activations and assured by the seller, “Like New” for $150!
If the D80 is a “TANK”……The D300 is a BIGGER TANK! When the box arrived from Ebay I was surprised how heavy it was. Did the seller send me something else with it? Upon opening, Just the camera, battery, charger, strap, CF Card and a UV filter. No, this camera weighs a ton! Couldn’t imaging hanging it around my neck for any length of time…”A millstone around his neck…”
OK, so now you know about my journey to acquire a camera (or two) to play with my vintage Nikon Nikkor lenses. Lets move on to the actual modification of same.
Why do we need to modify these NON-Ai lenses?
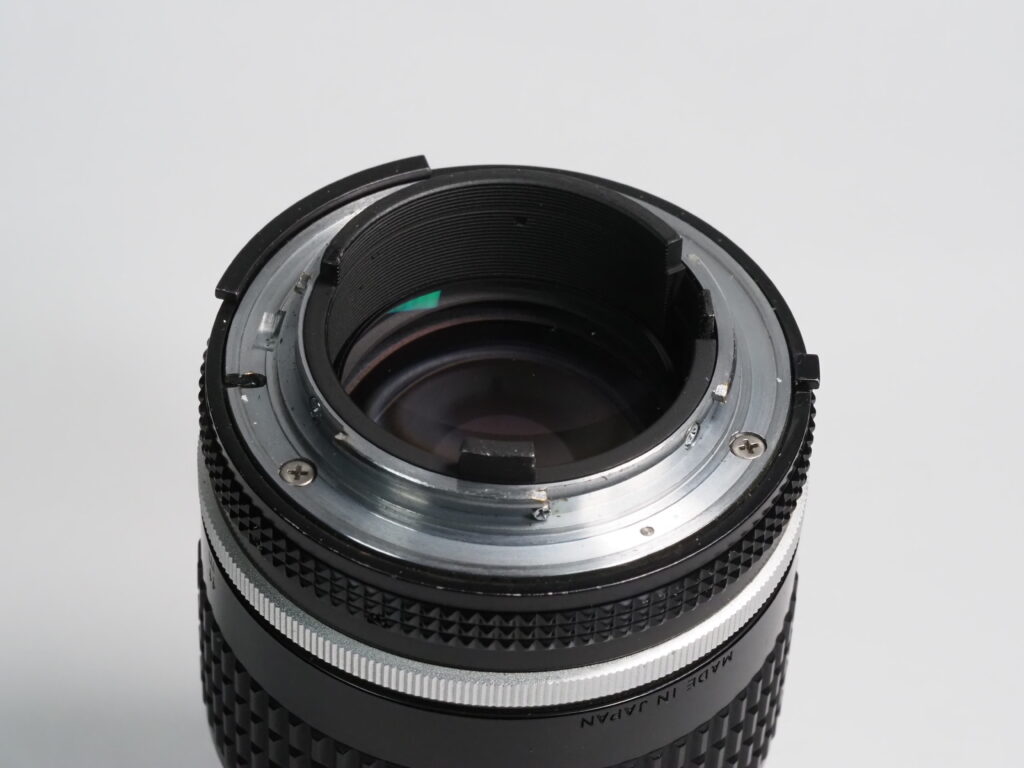
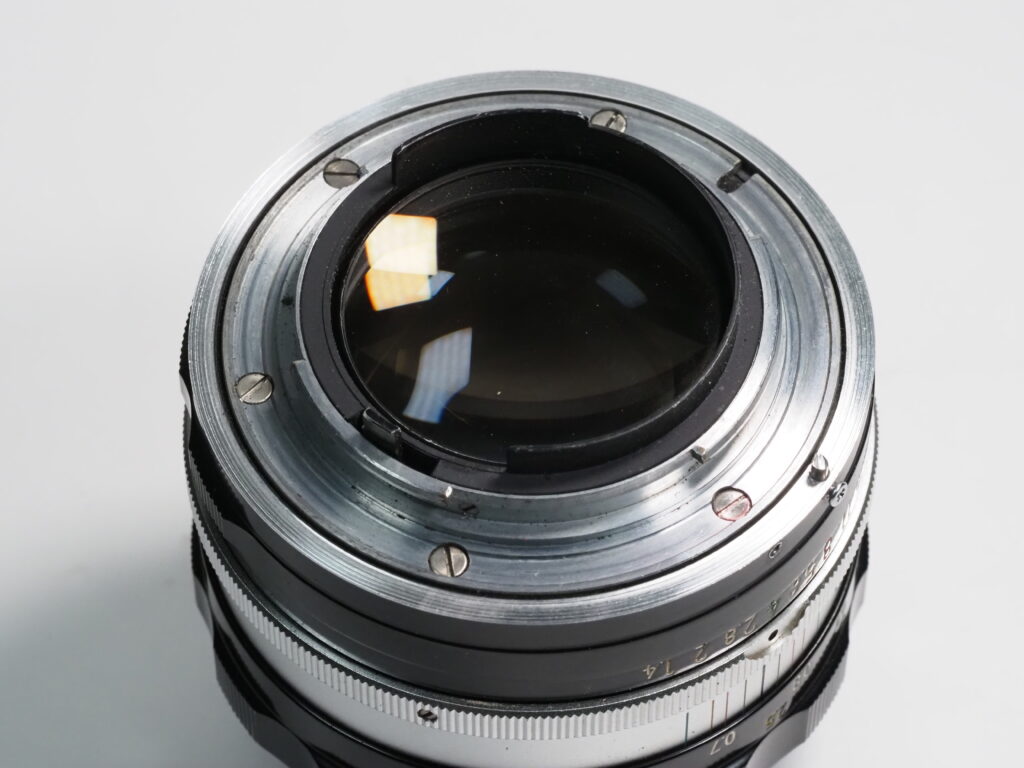
The Non -Ai lenses unlike the Ai and Ai-S lenses have a ring around the mount that will interfere or even damage the aperture sensor tab on digital Nikon cameras.
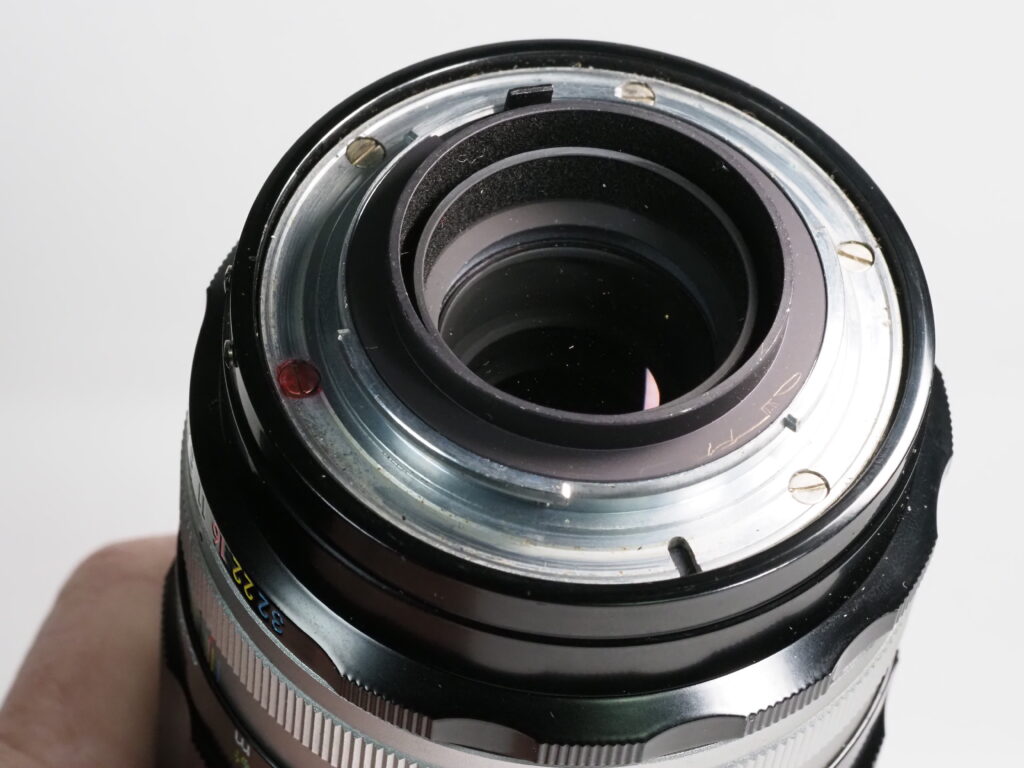
This RIM will contact the “tab” on Nikon DSLR cameras.
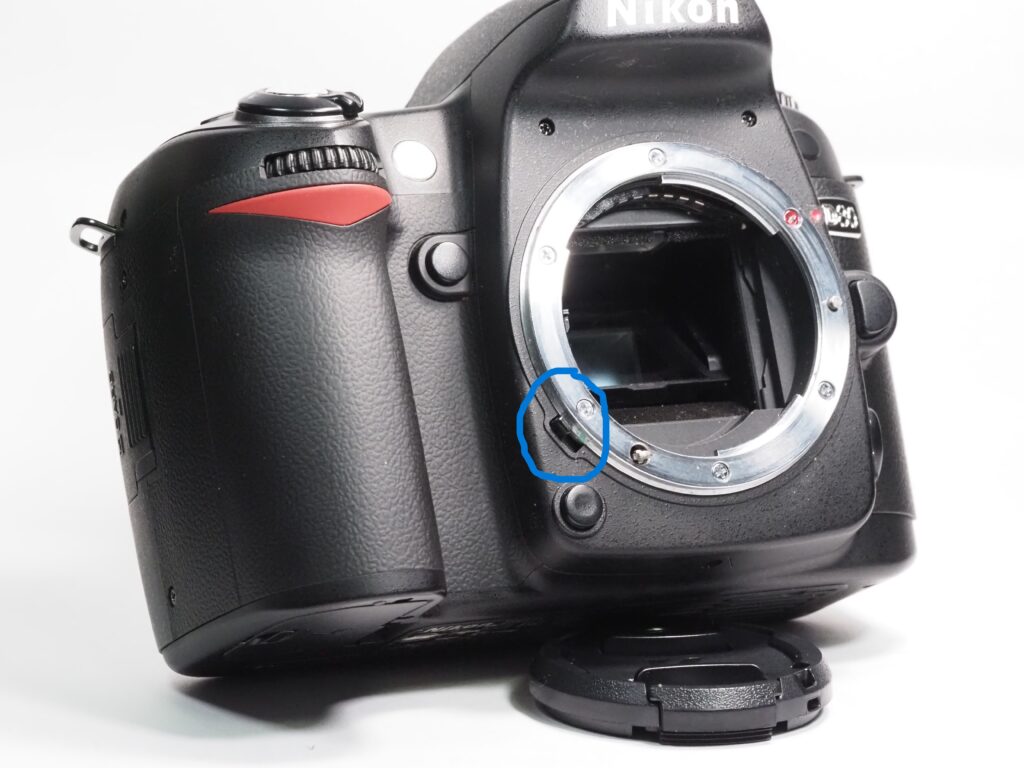
Here is the D80’s tab location:
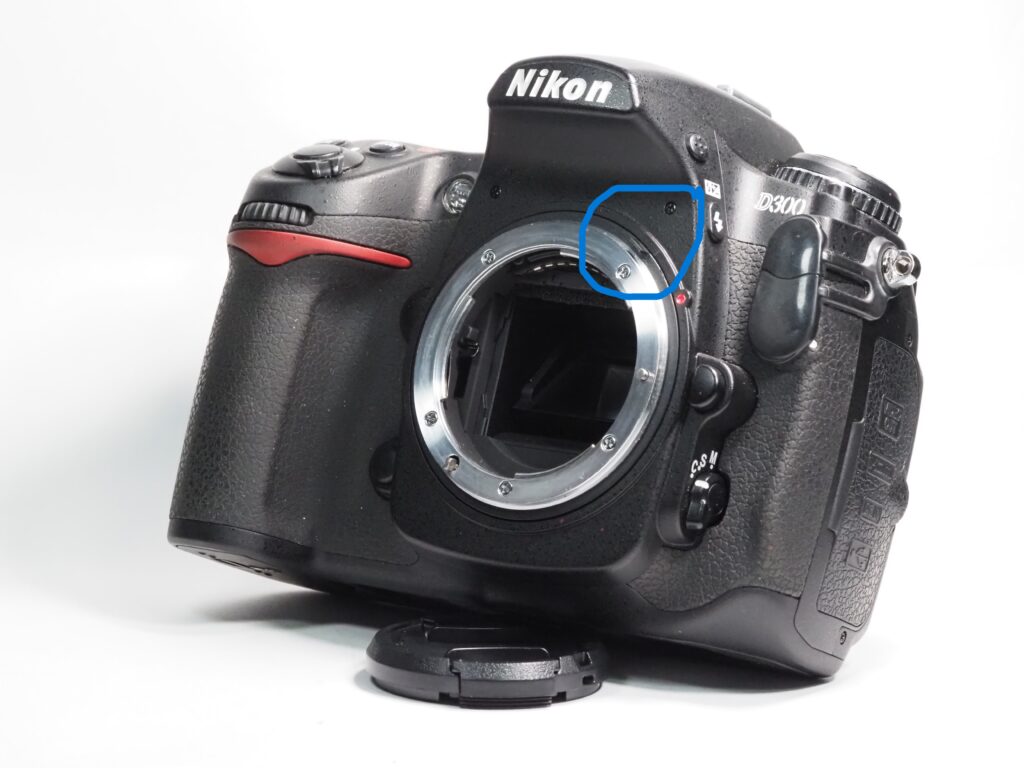
And here is the location of the D300’s tab.

The Ai and AiS lenses have part of this rim removed and the parts that remain are to activate the F-Stop information.
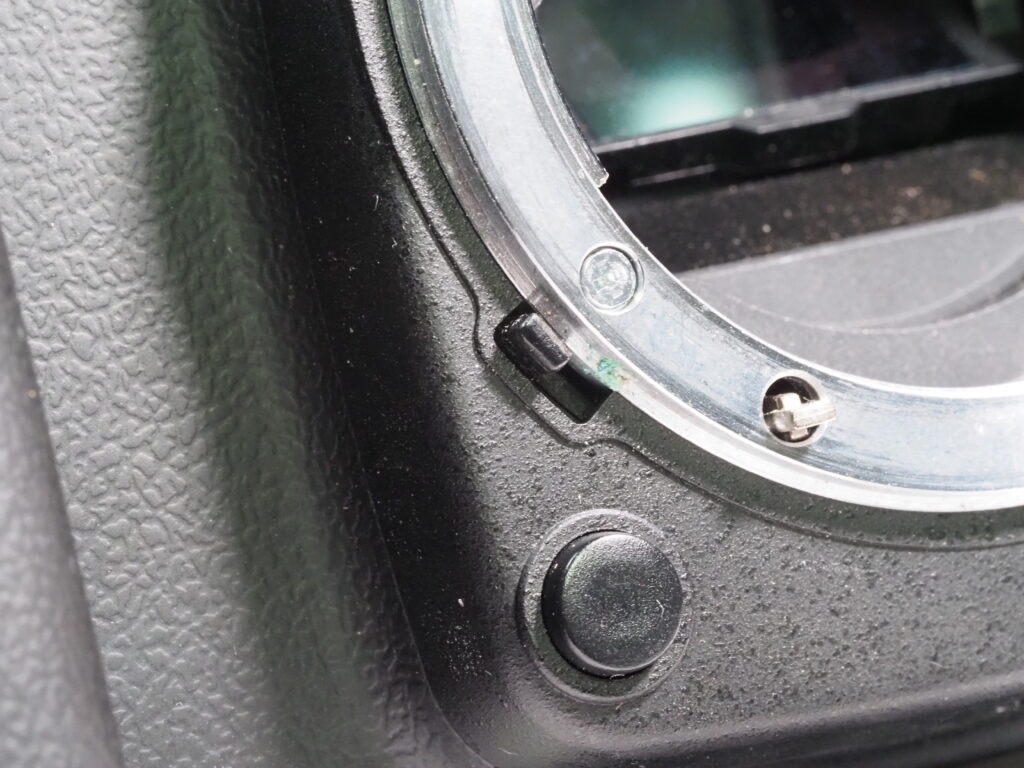
Here is Ai lens mount:
The interned has dozens of YouTubes and Web Site showing various ways to accomplish this modification. Some are real hacks and some are way too complicated.
The easiest way to accomplish all of this is to send your lenses to John White, the Guru of Nikon lens conversion. A really great and helpful guy who answers email nearly immediately and really knows this stuff! jtwhite3@gmail.com ….. https://jwhite.domainhost.com/
But if you know me, I’m going to reinvent the wheel, and do it my way!
It helps that I have an entire machine shop in the garage, but with files, hack saw and a good accurate drill press, you can accomplish what I “invented”…
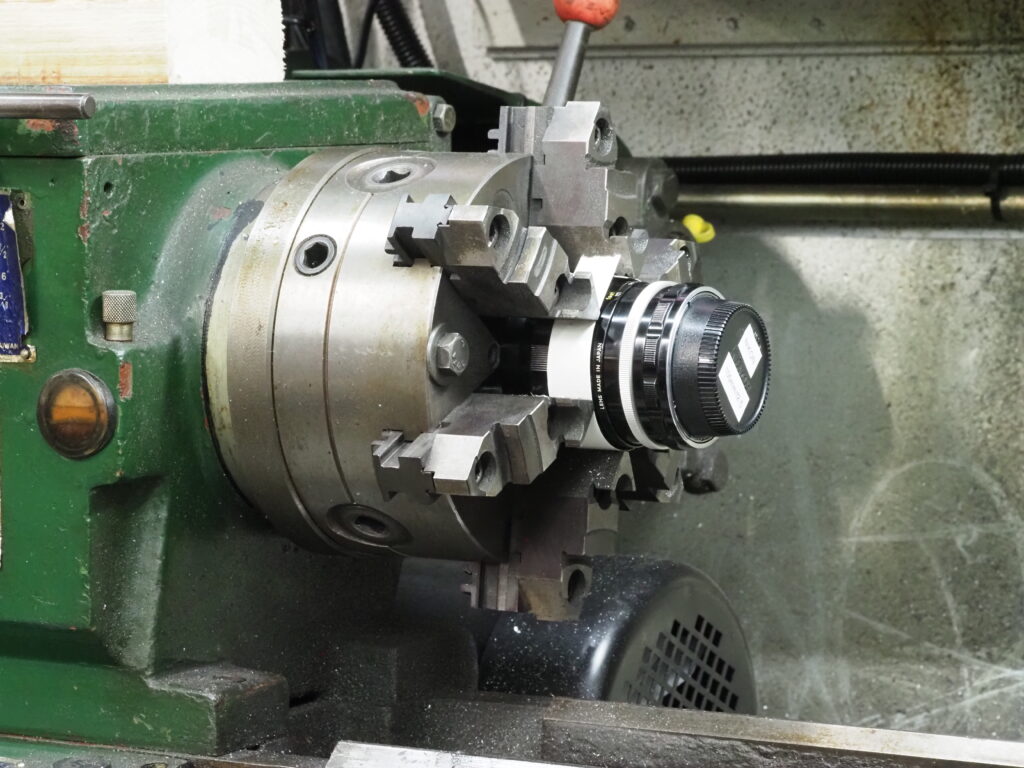
So, first course of business. Using my metal lathe I remove the entire rim from the lens. (YIKES!, is he really doing this!) These lenses are VERY inexpensive. Some of the Non-Ai lenses I have I got for free on an old camera that I sold for what I paid and sometimes more. They have no real collector value. So, what the heck!
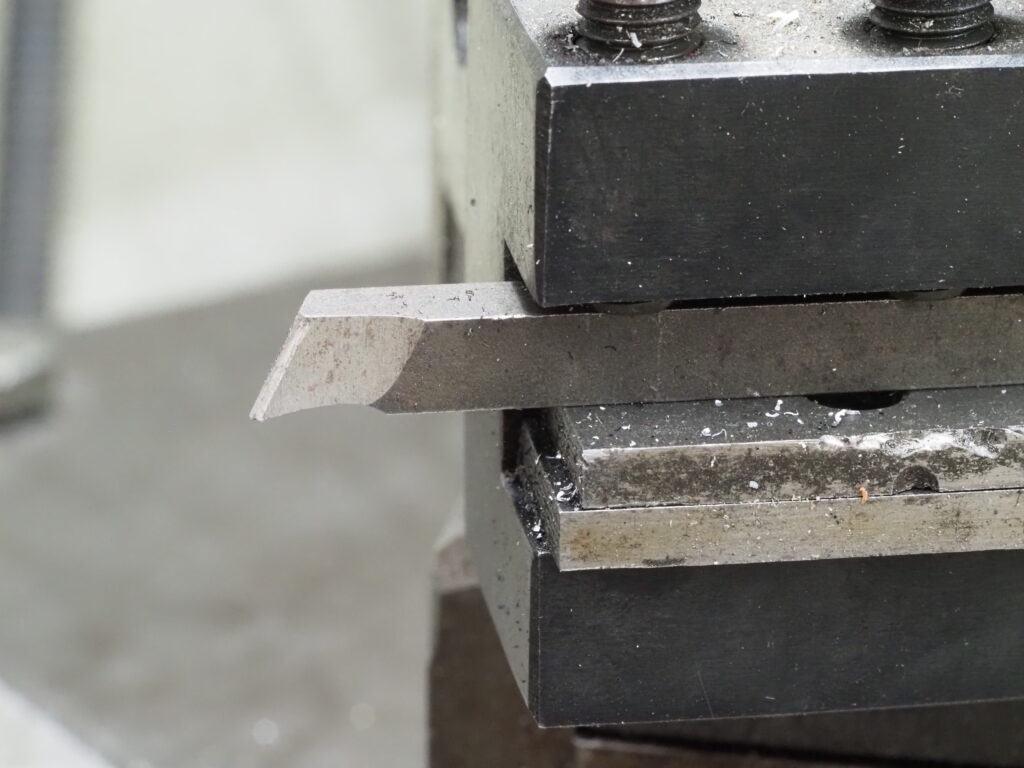
The lens is chucked up in a very secure 6 jaw chuck, and run in reverse so that the lens doesn’t try to focus and unscrew itself when the cutter is applied. The cutter is then mounted upside down in the bit holder. (Don’t ask me how I found out about this! Fortunately no real damage done…Well, not much. Parts are on the way!)
The rim is completely removed:

Once this is done, we are going to drill a very tiny hole in the rim to access the tab on the camera. But first we need to locate where this pin goes EXACTLY!
There is a web site that gets into a whole bunch of math on how to figure this out. I hate math! So I did it “MY WAY”
I took a paper clip and bent it into this configuration:

Using a piece of Gorilla tape (BTW, the best tape in the world!) I attach it to the lens and moving it forward and back with the lens attached to the camera, I can read the F-Stop on the D300 top screen.
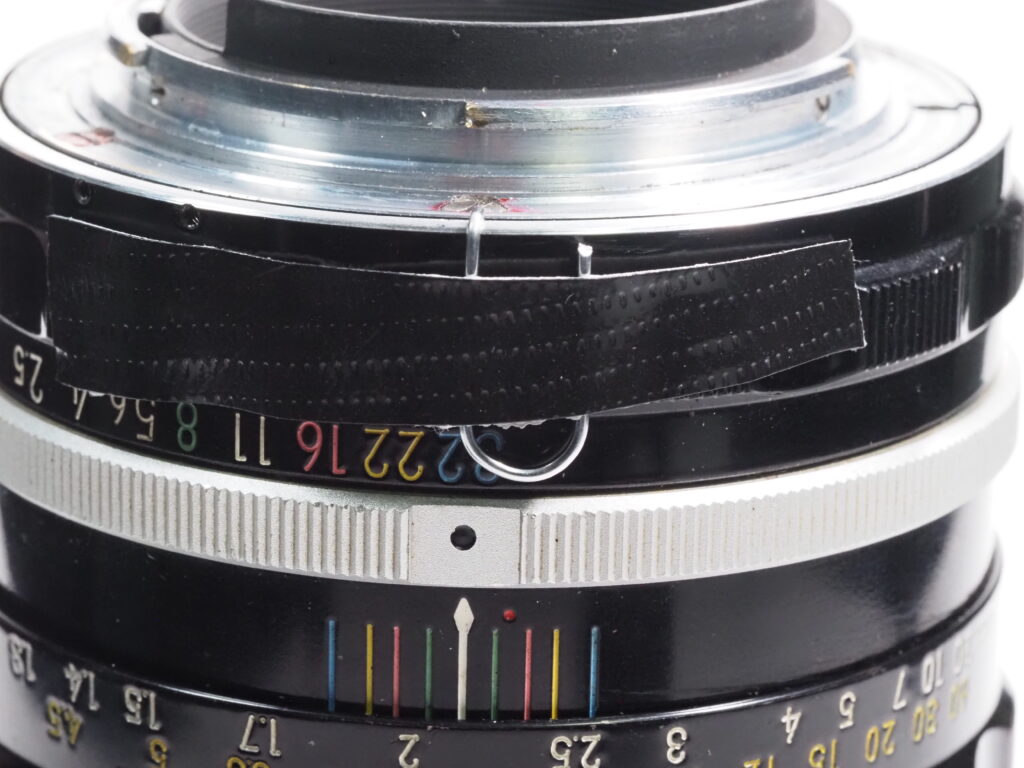
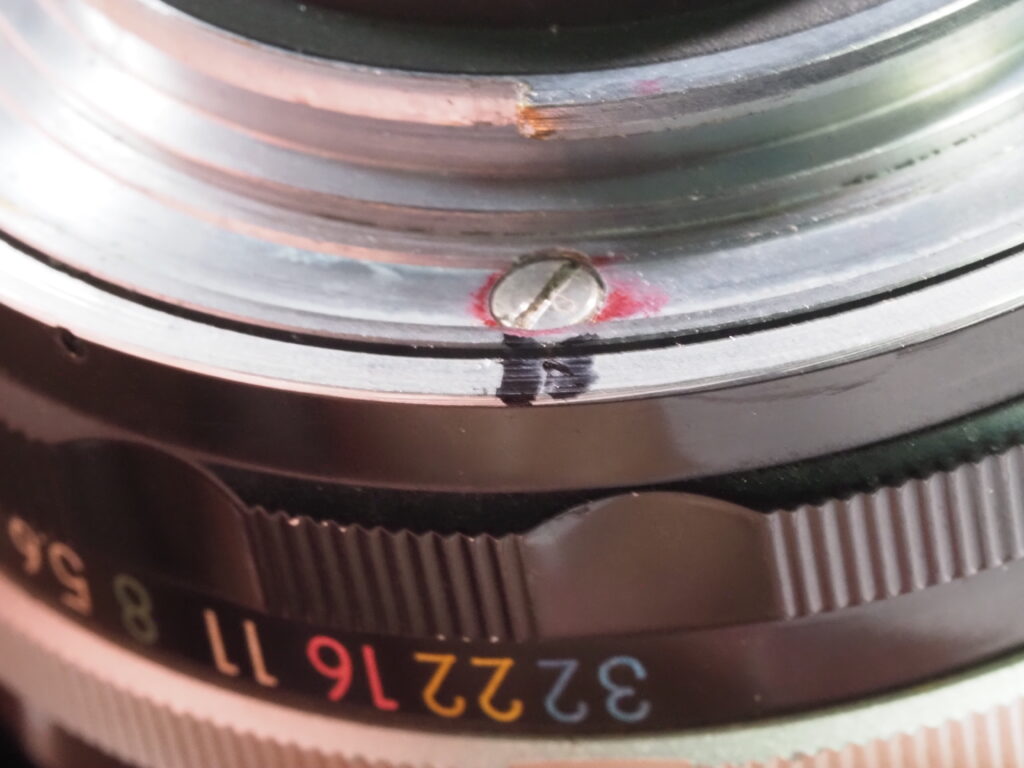
Once the absolute correct location is decided, a very fine sharpie pen is used to mark both sides of the paperclip.
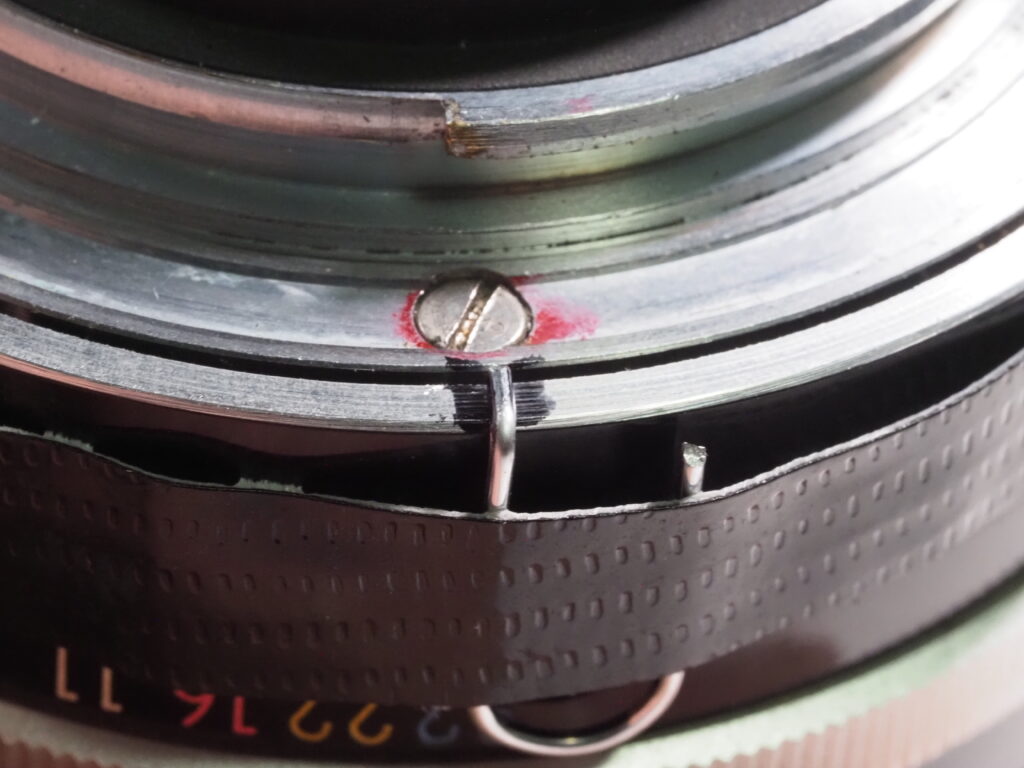
Between these two lines is where I will drill for the pin.
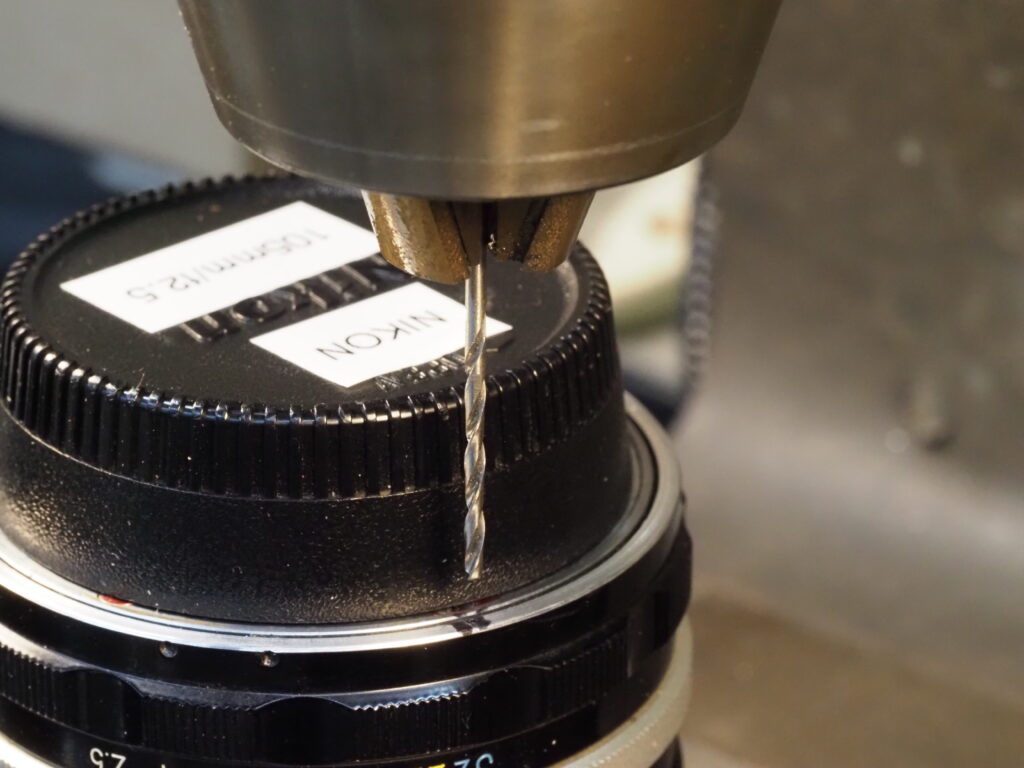
Now to the milling machine.
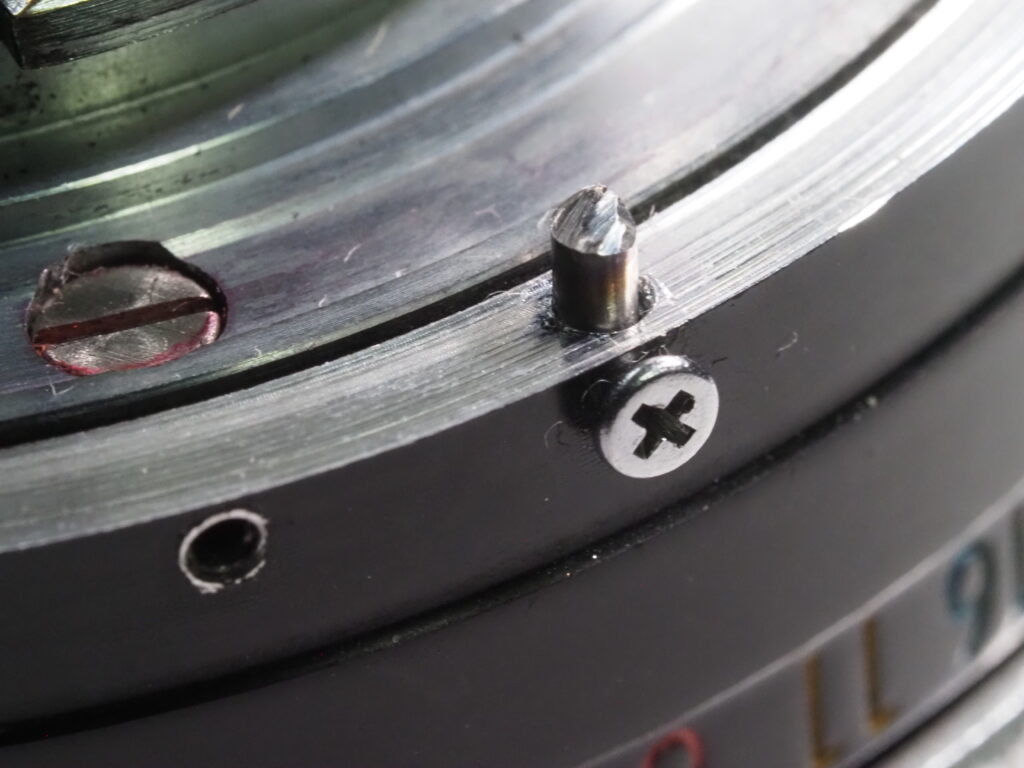
A 1/16″ drill bit is installed, and very, very carefully a hole is drilled into the rim of the lense.
Next, using the same drill bit that was used to drill the hole, small piece is cut off with an abrasive cut off wheel on a Dremel tool and inserted into the hole with a very tiny bit of superglue. (Be very careful here, too much and you won’t be able to turn the aperture ring. No, I did not have to learn this the hard way!)
Once the pin is installed…DONE!
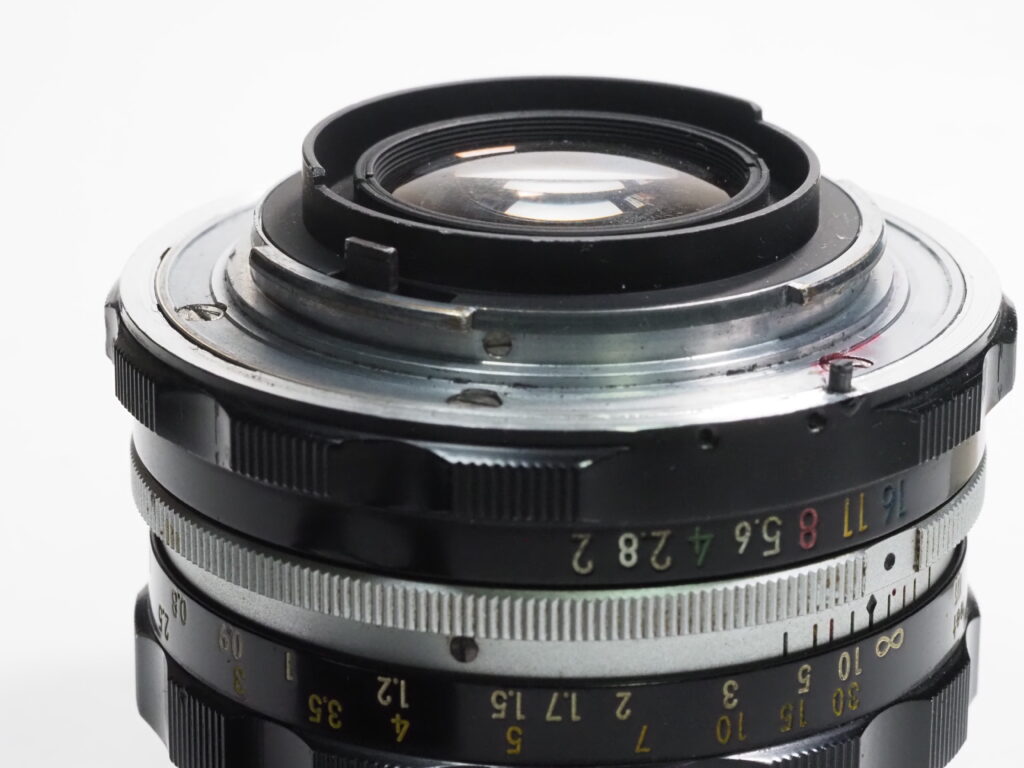

Sometimes you get REAL lucky and the pin is inserted right behind one of the threaded hole that used to hold the “Bunny Ears”. Then a set screw holds the pin in place.
Now if I wanted to use these lenses on the D80, I would need to drill another hole and insert a second pin. But since the D80 hold no advantage as the D300 does, I’ll not be going down that path.
I hope you enjoyed this little journey of mine. I love messing around with stuff. Check out other crazy projects on my web site www.rvbprecision.com and my YouTube channel.
It’s a great hobby!
https://www.youtube.com/@roybertalotto6355
All photos were taken with:
OM System:
OM-D E-M1 Mkll
Olympus 60mm / f2.8 MACRO