
As I plan on doing a certain amount of Boondocking and being off the beaten track, I needed a way to reach out for cell service for data and voice, and when it presents itself, the ability to tap into free WiFi service that might be out of range of the internal WiFi antennas of my phone and laptop.
I decided on two systems. Both sourced from TechnoRV.com as they easily have the best after sale support. And being all thumbs when it comes to this internet stuff, I need all the help I can get!
For cell boosting I went with the WeBoost Drive 4G-M unit. This system consists of  three pieces. An inside, flat plastic,  wall mount antenna to receive signal from your phone, tablet, laptop or other cellular broadband device, a wall mounted amplifier and an outside magnetic mount antenna.
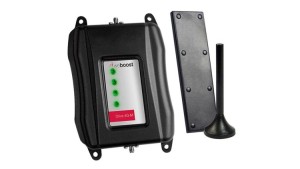
When sitting in your aluminum RV, it might be difficult or impossible for your laptop or smart phone to get signal. This Booster receives the signal from your device to the inside flat antenna, amplifies it and sends this amplified signal to the outside antenna and in turn to a cell tower.
Installation is very straight forward. But a few thing to keep in mind.
Try and keep the inside antenna and the outside antenna as far apart as possible. If you have the two antennas too close you risk oscillation. I mounted the magnetic outside antenna toward the front of the trailer and the inside antenna toward the rear. I have about 16′ separating the two and I have no issues with oscillation.
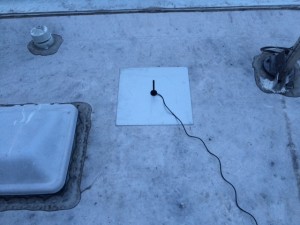
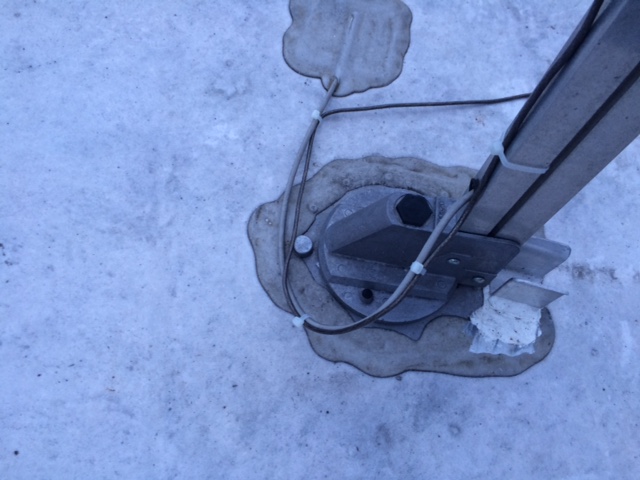
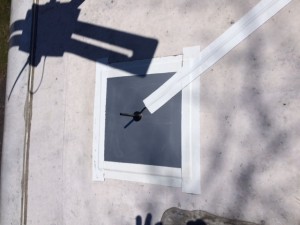
The magnetic mount antenna must be mounted to a metal surface. The metal surface acts as a “ground plain” and is necessary for the system to work properly. Most RVs have a rubber, aluminum or fiberglass roof. The aluminum roof would work as a good ground plain, but the magnetic mount won’t attach to it. My roof is rubber so I cut a piece of galvanized steel I had laying around the shop to 13″ X 13″ and glued it down to the roof with 3M 5200 marine adhesive
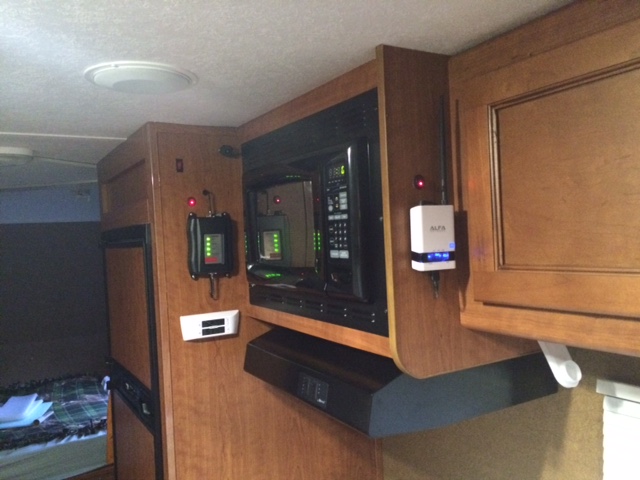
The wire from this antenna was simply run down the refrigerator vent and into the area behind the microwave

Once the weather warms up a bit more I’ll secure these wires to the roof with Eternabond tape, like I did for my Solar installation
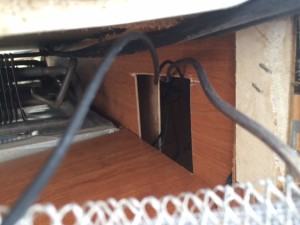

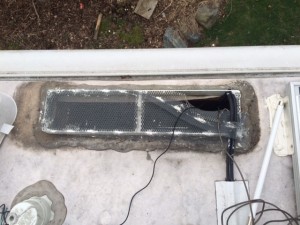
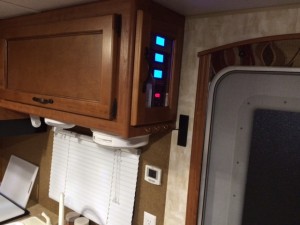
I had previously cut a hole behind the microwave and into the refrigerator vent for the passing of a bunch of other wires

The WeBooster was mounted to the wall next to the microwave space which is just about centrally located in the trailer

Holes were drilled for the various wires and I added an illuminated switch to turn the unit on and off. The kit comes with a “cigarette lighter” plug which I cut off and hard wired it through this toggle switch.
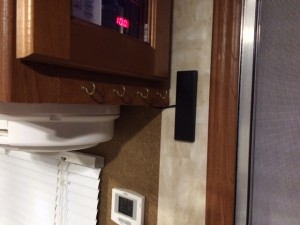
And lastly, the flat plastic, wall mounted, inside antenna was mounted next to the rear door with Velcro and the wire run to the amplifier. I mounted this antenna near the door and with Velcro so I can move it outside if needed. My understanding is the range on this receiver antenna is limited so time will tell if I need to move it outside when sitting under the awning, cruising the internet.

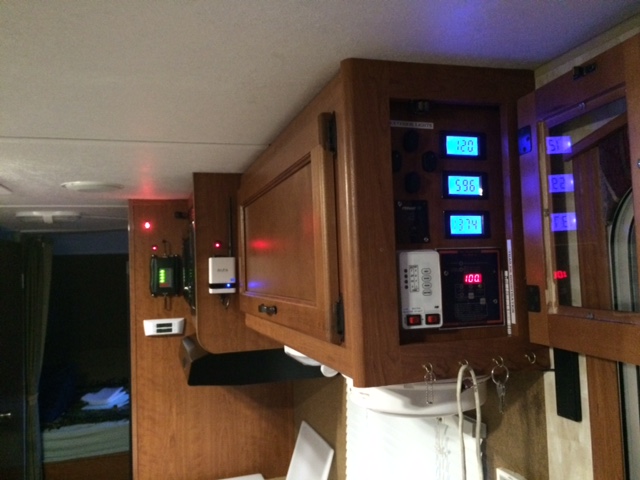
The finished job
(BTW…The white device you see in this picture is a refrigerator, wireless temperature device. A transmitter is in the freezer and one in the refrigerator. This thing will transmit well over 100 feet. I can have the receiver in the house monitoring the refrigerator and freezer as I’m cooling it down getting ready for a trip. You can read more about it here:
http://rvbprecision.com/rv-projects/forest-river-cherokee-grey-wolf-19rr-toy-hauler.html
If you are even remotely thinking about installing a cellular booster in your RV, you must watch this video. About the best I’ve seen on the subject:
Now it is on to installing the WiFi Booster. This device will allow you to connect to WiFi at a campground that might be too far away for the little antenna in your tablet, laptop or phone to reach. It is actually a “repeater” . Your device logs into the modem and sends the signal to an antenna mounted on the roof of your RV. The return signal from the campground or restaurant’s wifi is received by the antenna and sent back to your device through the inside mounted router’s antenna. Neat!
You might be able to “reach out” to free wifi from a restaurant, library or coffee shop that is some distance from your camping spot.
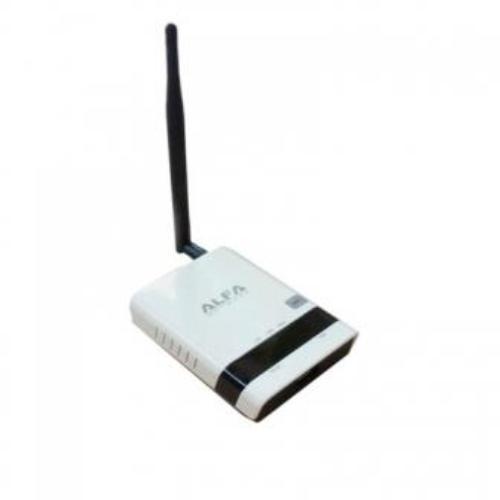
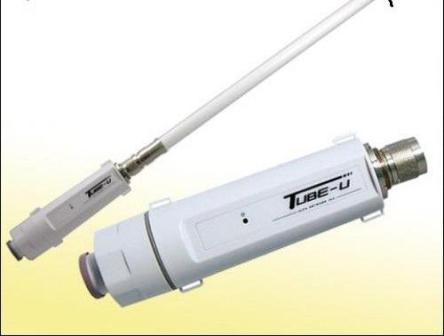
The units I went with are the ALFA  USB WiFi Repeater and the External WiFi Booster Tube antenna.
 Â
The price is extremely reasonable for this pair. At the time of this writing (4/16), $160. The support in getting this thing set up from TechnoRV is fantastic. Even I could do it!
I like the fact that the antenna contains the amplifier. Therefore the connection between the router and the antenna is via a USB cable and not a COAXÂ antenna wire. Coax antenna wire has extreme loses in the type of wire we would use in an installation in an RV. With USB cable there is little chance of RF interference and no loss of signal. This system also powers the antenna via the USB cable so there is no need to run an additional power wire to the roof. Nice!
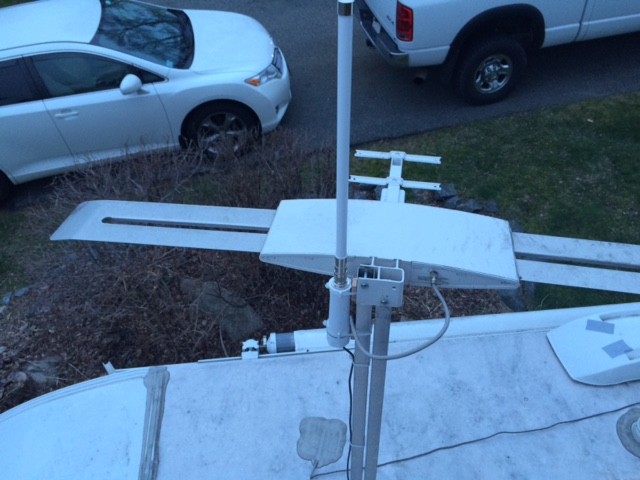
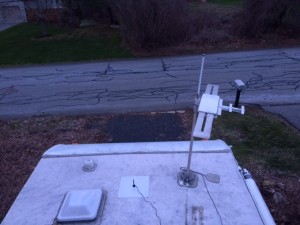
To get this antenna as high as possible, and not be vulnerable to tree branches etc,  I mounted it with a couple of wire-ties to the Winegard TV antenna.
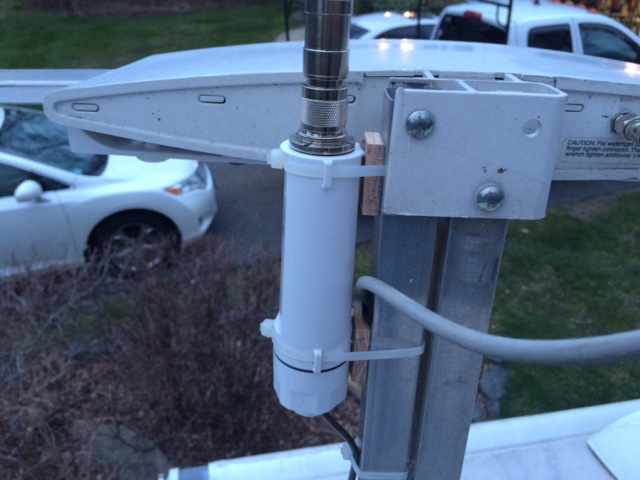
AÂ couple of small oak blocks and double sided foam tape help secure everything and keep the antenna away from the TV cable
The wire from the Booster antenna simply follows the TV antenna wire. Again, being USB, there is little chance of RF interference between the two.
All these cables will be secured to the roof with Eternabond tape once the weather warms up a bit, like I did in my solar installation.
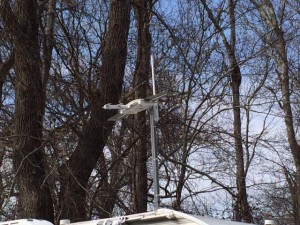
With the TV antenna in the stored / travel position, the WiFi antenna follows suit. Out of harms way….If I remember to put it down!!!
Once again the USB cable was fed down the refrigerator vent and into the space behind the microwave….(see above)
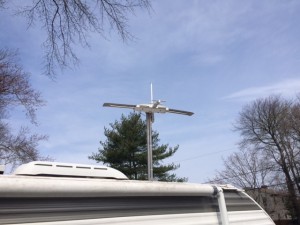
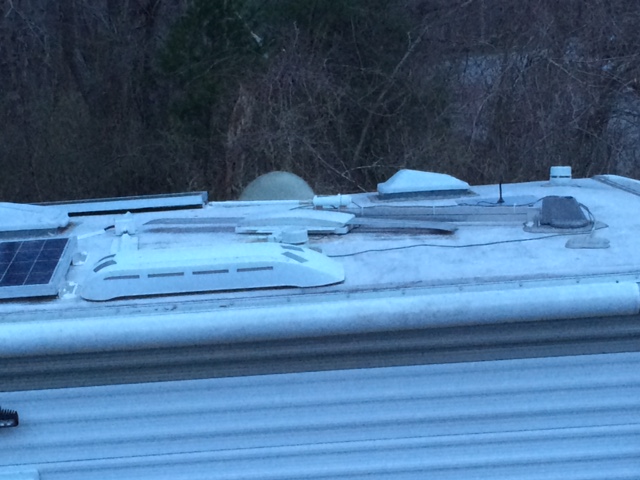
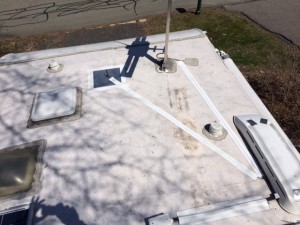
Here is the roof with Cell Booster antenna, WiFi Booster antenna and the Winegard TV antenna all in the deployed position.
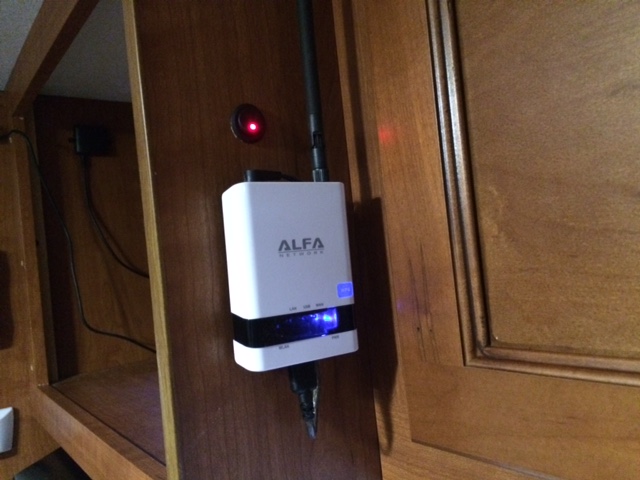
The ALFA repeater was mounted to the side of the microwave cabinet after the holes were drilled and wires fished and again a power on/off switch was installed
The power wire and USB cable simply were threaded through a single hole behind the unit. The two small screws secure the unit via screw slots on the back of the repeater. If you didn’t want to make holes in your camper, this unit could easily just sit on a shelf. The antenna can be positioned many different ways.
And here is the finished duo
(The little black device in the corner, near the ceiling is a TV camera. This trailer is a Toy Hauler and that camera wirelessly transmits the picture of the contents (motorcycle) in the trailer to my Garmin 760RV GPS mounted on the dash of my truck. You can read more about that project here….http://rvbprecision.com/rv-projects/dodge-ram-2500-dash-modification.html
As you can see here, I’m a nut for blinking lights and monitoring stations…..Starting to look like the Space Shuttle in here!
You can read all about the Solar Project and what all this stuff is here…
http://rvbprecision.com/rv-projects/solar-install-grey-wolf-19rr-toy-hauler.html
Well now I need to get out in the boonies and give it a good test. Here in my driveway, without the WiFi Booster, I can barely get the WiFi signal from inside my house. And that is the only WiFi I see. With the WiFi Booster turned on, I’m seeing over 25 WiFi signals. And three of them from various businesses (golf course, restaurant, and someone named “Mel”) are unsecured!
To test the Cellular Booster, I used  the APP…”Speed Test” on my phone. I’m appreciating the following improvements:
Turned everything on and opened up the “SpeedTest” app on my Vertizon Iphone5s
I selected a server that was 50 miles away:
WeBoost OFF…Ping 59ms / Down 4.02Mbps / Up 1.85 Mbps
ON…Ping 63ms / Down 3.26Mbps / Up 3.58 Mbps
I then selected a server 100 miles away:
WeBoost OFF…70 / 3.28 / 0.97
ON…69 / 3.79 / 2.61
Server 150 miles away:
WeBoost OFF…67 / 3.63 / 1.14
ON…69 / 5.01 / 3.88
Next I used my Sprint HotSpot that WeBoost said would not work because Sprint now uses some new frequency that WeBoost doesn’t handle:
50 miles away…OFF Â 158 / 2.72 / 2.54
ON Â 75 / 1.25 / 1.72 Â (The WeBoost must be affecting this device for the numbers to go down??)
Next was my Verizon HotSpot
50 miles away… OFF Â Â 108 / 1.36 / 4.48
ON Â Â 80 / 2.48 / 6.13
As you can see, dramatic improvements!
I want to thank Chris and Cherie at http://www.rvmobileinternet.com and Eric Johnson at http://www.technorv.com/ for all the assistance and advice on this project. BTW, if you are not a member of  RVMobileInternet.com, and you want to better your internet and WiFi performance on the road, you should be! Chris and Cherie authored a fantastic book on staying connected while on the road. It needs to be in every Rv’s library. https://www.rvmobileinternet.com/get-your-ebook/
UPDATE 4-10-16…TESTING
This evening I was out in the trailer playing with the new gadgets and my various devices. I found the WeBoost Cellular Booster is extremely sensitive to the distance between the phone and the indoor receiver antenna.
Some tests I performed.
With the phone right up against the antenna I saw signal strength of -88 (lower the number the better)
One foot away from the antenna…. -92
Two feet away from the antenna…. -100
Four feet away from the antenna… -103
Six feet or more away from the antenna… -109
Cellular Booster turned off … -111
This is a huge difference. These numbers are logarithmic. I haven’t done the math but the difference between -88dB and -111dB is many hundreds improvement.
So, if you can’t sit extremely close to the antenna, or actually tie it to the phone with a rubber band, you will not experience the best performance. If you are using your phone as a HotSpot or are actually using a HotSpot, I’d place it right on top of the antenna and use WiFi to connect to the phone or HotSpot. If you are using the phone to talk, I’d tie the phone to the antenna and then use a wired or BlueTooth headset to communicate.
Folks have asked me about security. Obviously, this limited range precludes anyone from using your cell booster unauthorized. And the WiFi booster has an access PassWord to stop unauthorized use of that device.
Hope this helps!
UPDATE 4-15-16
Finally a warm day so I can adhere the WiFi antenna and Cellular Antenna cables to the trailers roof with Eternabond tape.

I also used Eternabond tape to adhere the metal plate that is acting like a ground plane to the roof.
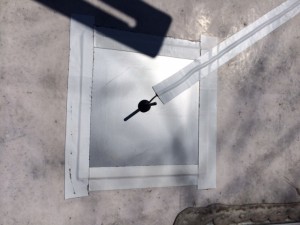
Nothing like this Eternabond tape. If you clean the surface real good (I use alcohol), you simply can’t remove it. Better than more holes in the roof to attache this metal plate!
Ready to go camping off the beat’n track!
3 comments on “Cellular Booster and WiFi Booster RV Install”